
2012-2013 Dear Jane Stickle 2d Cyber Party Pictures and Discussion
 02-28-2012, 03:10 PM
#601
Power Poster

Join Date: Mar 2011
Location: western NY formerly MN, FL, NC, SC
Posts: 51,430
cindy a - so glad you are now caught up. that's what we have this week for 
ann clare - what a wonderful collection of bright blocks. it will be a stunning quilt
fromzstore - well, you sure are way ahead of the rest of us. the blocks look great
ann clare - what a wonderful collection of bright blocks. it will be a stunning quilt
fromzstore - well, you sure are way ahead of the rest of us. the blocks look great
 02-29-2012, 01:48 AM
#602
Super Member
Join Date: Mar 2011
Location: The Netherlands
Posts: 6,063
ann clare, beautiful and so bright!
QuiltnNan, you did a great job on your first paper piecing! My first didn't look that good!
QuiltnNan, you did a great job on your first paper piecing! My first didn't look that good!
02-29-2012, 08:36 AM
#603
Super Member

Join Date: Jan 2011
Location: Eastern Washington
Posts: 6,514
You ladies are doing great. I will hopefuylly get to join in. I am on a quest to finish those UFOs so will see if I can fit this in.
02-29-2012, 05:45 PM
#604
Super Member
Join Date: Dec 2011
Location: Virginia
Posts: 1,257
@ Fabric Galore: I'm not sure but if it felt like newsprint it might be the right one. Can you hold it up to a light source and see the outline/shape of a dark fabric behind it? If you cannot hold the paper and fabric up to a light and see the outline of the fabric (that is on the other side of the paper) then I think it will be hard to work with.
02-29-2012, 08:44 PM
#605
Senior Member
Thread Starter

Join Date: Oct 2010
Location: Agoura Hills, CA
Posts: 926
Finally....some pics are being posted by Gus.....
I have the camera, the transfer do-hicky, and I'm all caught up and even started next week and have a couple of pointers on them.
Not sure exactly how many pics I can load at once so we will see.
Here you will see A1 and A5, B1 and B2, B3 and B10, and B12 and A3
I have the camera, the transfer do-hicky, and I'm all caught up and even started next week and have a couple of pointers on them.
Not sure exactly how many pics I can load at once so we will see.
Here you will see A1 and A5, B1 and B2, B3 and B10, and B12 and A3
02-29-2012, 08:59 PM
#606
Senior Member
Thread Starter
Join Date: Oct 2010
Location: Agoura Hills, CA
Posts: 926
What a nightmare A1 was by the way!! I am very happy with the way it turned out but as you see I did not adjust the pattern to make the outer square on point shape as suggested [and as I should have done] I left the lighter off-white pieces on the side in one piece. I actually started out with 8 over-sized half square triangles, pieced four together to make the octagon shape in the center, and then continually sewed [and un sewed and sewed and unsewed, etc....for hours]little parts of seams matching it to the photo in the book until I had it right. I think it would have been waaaaay faster to hand sew this one!
Now I will attach the three triangles - BR1, TR1 and TR3 and also the two blocks I have completed for next week. A7 and the ever so lovely A9. Thanks for that crayola piecing suggestion. I love it!!!! have grandsons and crayola paper galore here and it really does work to hold it up to the light even though it is opaque.
A pointer for sewing the white strip sections that go all the way around [3rd round from the square]. You should pick a side and sew it starting from halfway point to the edge that will be tucked under by the next piece. [If you look at the book or the instructions on thatquilt.com you will understand what I mean - I wanted mine to look like Jane's with all ends tucked under and this is the simplest way to accomplish]. Continue adding subsequent strips around clockwise [or counter-clockwise, whichever way you have it drawn on your paper] lastly you will finish sewing down the first strip towards the other end.
03-01-2012, 01:26 AM
#607
Super Member
Join Date: Mar 2011
Location: The Netherlands
Posts: 6,063
Beautiful blocks Gus! Your ever so lovely A9 turned out just great!
03-01-2012, 04:14 AM
#608
Power Poster
Join Date: Mar 2011
Location: western NY formerly MN, FL, NC, SC
Posts: 51,430
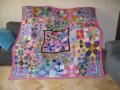
Gus, your blocks are so, so terrific!!!!! it's actually kind of nice that you are late posting, because seeing so many blocks at once is real eye candy. We've come a long way already in terms of difficulty
Now, looking at your A9, I realize that I did my first one wrong! When printing the foundation, my old eyes have a hard time seeing which sections are gray and which right. I wrote on the pieces which color, but missed the next to last dark ones, so I don't have 'spools' on the outside. And I was so proud of the way it came out since it was my first pp'd one - hmmmph. Fortunately, I stopped last night right before that round, so my second one will be right. I think I'll do the first one over, rather than unsew. If I continue at my current rate of error blocks, I may have another Baby Jane in the works
[ATTACH=CONFIG]316521[/ATTACH]
03-01-2012, 04:18 AM
#609
Senior Member

Join Date: May 2010
Location: Arvada, CO
Posts: 456
Gus, your blocks are beautiful!! I love your fabric choices.
03-01-2012, 04:34 AM
#610
Power Poster
Join Date: Mar 2011
Location: western NY formerly MN, FL, NC, SC
Posts: 51,430
HA! I just thought about the name for my Baby Jane --- BooBoo Jane
And, in looking at the foundation printout, changing my light round to dark actually makes it easier. The entire corner of the inner square is dark, so does not require 2 rounds to do those dark corners... for instance pieces 19 and 23 can be done in one big piece. So that saves doing 4 extra pieces!
And, in looking at the foundation printout, changing my light round to dark actually makes it easier. The entire corner of the inner square is dark, so does not require 2 rounds to do those dark corners... for instance pieces 19 and 23 can be done in one big piece. So that saves doing 4 extra pieces!

Thread
Thread Starter
Forum
Replies
Last Post
kluedesigns
Blocks of the Month and Week
6167
02-19-2013 08:53 AM
Cre8tvlwyr
Blocks of the Month and Week
875
01-14-2012 09:00 PM
Janstar
Blocks of the Month and Week
52
10-30-2011 04:23 PM
sandpat
Blocks of the Month and Week
35
12-12-2010 09:54 AM
Lacelady
Blocks of the Month and Week
89
06-17-2010 06:40 AM
