
Spool Pin Doily Pattern
 01-26-2017, 05:36 AM
#1
Super Member
Thread Starter
Join Date: Feb 2013
Location: North Florida
Posts: 2,156
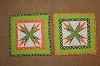
I love the spool pin doilies that I see in pictures of vintage machines and I wanted to make some for myself. There are only a few patterns on the web and they weren't what I wanted. I wanted something that looked like a flower and was easy to make, so I made up my own pattern. They take about 15 minutes to make and I've made enough for all of my machines, even the non-vintage ones.
Here's a picture of what it looks like.
[ATTACH=CONFIG]566779[/ATTACH]
Here's the pattern.
Use six strands of embroidery floss with a size 1 (2.35 mm) steel crochet hook.
Round 1: Chain 4, join with a slip stitch to the first chain to make a ring.
Round 2: Chain 3 (counts as a double crochet) and make 11 double crochets in the ring for a total of 12 stitches, join with a slip stitch to the third chain in the beginning chain 3.
Round 3: Chain 1, make a single crochet in the first stitch, chain 3 and single crochet in the same stitch, make a single crochet in the next stitch, chain 3 and single crochet in the same stitch, do this in each of the 12 stitches around, join with a slip stitch to the beginning chain 1.
Round 4: Chain 1, make a single crochet in the first chain 3 space, chain 3 and single crochet in the chain 3 space, make a single crochet in the next chain 3 space, chain 3 and single crochet in the same chain 3 space, do this in each of the 12 chain 3 spaces around, join with a slip stitch to the beginning chain 1, cut yarn, fasten off, and weave in ends.
Enjoy.

 01-26-2017, 10:30 AM
#7
Senior Member
Join Date: Jan 2011
Location: Michigan
Posts: 426
OK, thanks Irishgal. I just finished searching about them, and came back to let you know I had. Yes, mostly a decorative item, however, saves the paint from chipping off the machine, so also useful. I've been wanting to learn to crochet, so maybe this will be one of my first accomplishments.

 01-27-2017, 08:58 AM
#10
Member
Join Date: Aug 2013
Location: Oregon
Posts: 62

Thread
Thread Starter
Forum
Replies
Last Post
misskira
For Vintage & Antique Machine Enthusiasts
1
04-29-2012 05:29 PM
J Miller
For Vintage & Antique Machine Enthusiasts
6
04-17-2012 03:00 PM
J Miller
For Vintage & Antique Machine Enthusiasts
12
04-14-2012 08:08 PM
