
attic windows
 06-07-2012, 04:11 AM
#1
Super Member
Thread Starter
Join Date: Aug 2009
Location: Illinois
Posts: 1,825
I need some help making a yardage actually look like a person is looking through a window. When adding the "window", it breaks the scene. How does a person get the continuity right? I hope I'm explaining this so it is understandable. Example--an animal is in the yardage but, if I cut and insert the window frame, it will throw off the dimensions of the animal and not leave out the part that should be covered by the frame. Will I lose that amount of yardage when doing attic windows? Tutorial on this??
 06-07-2012, 04:38 AM
#2
Super Member
Join Date: Apr 2011
Location: Vermont
Posts: 1,095
short of applique of the window frame over the yardage, I don't see how you cannot lose some of the scenery. I would fussy cut out the important parts of the person, eyes, mouth, etc and make sure they made it into a frame of the window so the idea is clear that it's a person looking thru the window.
06-07-2012, 05:34 AM
#4
Power Poster
Join Date: Dec 2010
Location: Michigan
Posts: 11,276
I know exactly what you mean. I've done this before, it wasn't really hard, but I've tried to type the directions up 3 times and it is REALLY hard to explain!
Basically, I pieced the window parts, basted them together to make a grid/lattice and laid them it the uncut fabric and made a mark where the raw edges of the windows touched the focus fabric. Then I removed the windows and measured 1/2 from the original marking. This second measurement would have been covered by the window fabric (make sense?) This is where you would cut.
The half inch allows for the seam allowance. Seems like you would only need to add a 1/4 inch, but that's not the case.
Try this with some scrap fabric first.
06-07-2012, 05:44 AM
#5
Power Poster
Join Date: Apr 2011
Location: Ontario, Canada
Posts: 17,861
Measure once, measure twice, and measure again!!! 
I understand your dilemma ... depending on the width of your window frame, if you don't allow for this, you could have a very stretched out disproportionate animal!
Start with the measurements of your finished window frames and panes.
Sketch it out on paper first. Then draw it on the printed panel with chalk.
Next do your cutouts, being sure to add 1/4" all around for the seam allowance.
06-07-2012, 08:07 AM
#6
Super Member
Join Date: Aug 2011
Location: Asheville, previously Lake Vermilion, Tarpon Springs, Duluth, St Paul, Soudan
Posts: 1,651
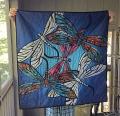
If the "lights" in your window are exactly 1/2" wide, you should have no displacement. Just draw the lines for the center of the window panes on the yardage, cut and sew on the panes. If they are wider, QuiltE has good tips for you. I would sketch out the setting on paper first if you are using window frames larger than 1/2 inch. This is a kit that did all the work for me. You should have 1/4" of the yardage under the frame on each side, so if your frames are wider than 1/2", you will lose some of the yardage or distort the picture.

Yes, I am obsessed by the Aerial Lift Bridge. And I am sorry that I cannot credit the maker of the kit, but I don't remember the name.

Yes, I am obsessed by the Aerial Lift Bridge. And I am sorry that I cannot credit the maker of the kit, but I don't remember the name.
Last edited by Krisb; 06-07-2012 at 08:14 AM.
06-07-2012, 11:50 AM
#9
Power Poster
Join Date: Apr 2011
Location: Ontario, Canada
Posts: 17,861
No, you'd probably encourage her that it's worth doing the little extra, persevering, and learning something new.
ITA with KrisB ... it's not so much hard as tedious. Just take your time and then measure and cut carefully!

Thread
Thread Starter
Forum
Replies
Last Post
