Go Back  Quiltingboard Forums >
  • Main
  • cutting a large quarter circle??? >
  • cutting a large quarter circle???

  • cutting a large quarter circle???

    Thread Tools
     
    Old 05-23-2014, 06:18 PM
      #1  
    Super Member
    Thread Starter
     
    Join Date: Nov 2010
    Location: Cadillac, MI
    Posts: 6,487
    Default cutting a large quarter circle???

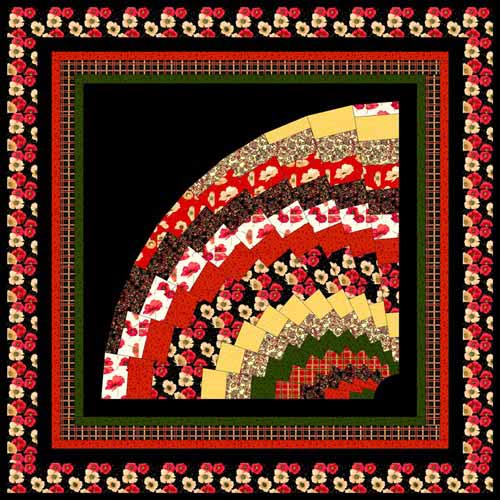
    I want to make a quilt with the ten degree ruler that is a large quarter circle with the blades pieced similar to a Spicy Spiral table runner. The pattern calls for it to be pinned on the black background and stitched down. I want to do a huge curved seam. Am I correct in thinking I can just pin the quarter circle on the background and mark the edge, remove it and add 1/2" for a seam and then sew them together. I have much experience setting in garment sleeves and don't anticipate any problem with the sewing. Is the 1/2" correct? I may change my black as I have Michael Miller's Fairy Frost and I found it a little difficult to ease if needed with that finish on it.
    irishrose is offline  
    Old 05-24-2014, 02:33 AM
      #2  
    Power Poster
     
    Join Date: Feb 2009
    Location: Northern Michigan
    Posts: 12,861
    Default

    you will be using a 1/4" seam allowance on the background and a 1/4" seam allowance on the fan (unless you are stitching 1/2" seams???
    ckcowl is offline  
    Old 05-24-2014, 04:28 AM
      #3  
    Power Poster
     
    Join Date: Dec 2010
    Location: Michigan
    Posts: 11,276
    Default

    Well, that's going to be beautiful! Adding 1/2" won't work, however, you need to base everything off the seam line on both pieces. Figure out your seam line on the fan (so 1/4" in) draw the seam on the background then add a 1/4" to that. When you are done, the curves will look totally different on the 2 pieces, but they should seam up OK. Here's a link to a drunkard's path template. You can see that the curves are different:
    http://www.everythingquilts.com/brow...Templates.html
    You will need to starch the background so that big curve doesn't stretch, and pin like you are easing a sleeve in. I would do a trial run with a couple pieces of scrap fabric. Another alternative is to applique the fan onto the background.
    PaperPrincess is offline  
    Old 05-24-2014, 06:02 AM
      #4  
    Power Poster
     
    Join Date: Jun 2011
    Location: Southern California
    Posts: 19,127
    Default

    WOW, very stunning quilt design. I am going to be working on a New York Beauty and I am going to need to learn how to sew a curved seam too. I haven't sat down and read the instructions. It is a paper piece design by Judy Niemeyer so I hope she has some good hints.
    ManiacQuilter2 is offline  
    Old 05-24-2014, 07:53 PM
      #5  
    Super Member
    Thread Starter
     
    Join Date: Nov 2010
    Location: Cadillac, MI
    Posts: 6,487
    Default

    Thank you, Paperprincess. That's what I needed. The pattern appliques it on, but I'd rather have a seamed finish.
    irishrose is offline  
    Old 05-24-2014, 10:10 PM
      #6  
    Super Member
     
    Evie's Avatar
     
    Join Date: May 2010
    Location: Los Angeles
    Posts: 1,886
    Default

    Would you need to cut the end of the blades another 1/4" since the blades are not actually curved? Or is the 1/2" you're considering just on the background?
    Evie is offline  
    Old 05-25-2014, 11:35 AM
      #7  
    Power Poster
     
    Join Date: May 2008
    Location: MN
    Posts: 24,581
    Default

    I think this is what you are describing?

    If so, I am fairly sure that it would work.

    PS. Trim the backing on the green line.
    Attached Thumbnails curve006.jpg  

    Last edited by bearisgray; 05-25-2014 at 11:42 AM.
    bearisgray is offline  
    Old 05-25-2014, 03:52 PM
      #8  
    Super Member
    Thread Starter
     
    Join Date: Nov 2010
    Location: Cadillac, MI
    Posts: 6,487
    Default

    Evie, If the outside edge of the arc isn't curved, that's an easy fix with a pencil and a string. Or more likely, I'd just eyeball it.

    bearisgray, that is exactly my original thought.
    irishrose is offline  
    Old 05-25-2014, 04:26 PM
      #9  
    Member
     
    patchy-at-best's Avatar
     
    Join Date: Oct 2010
    Location: Brissy, Australia
    Posts: 84
    Default

    To avoid applique or curved piecing, add a wide strip of black to the strip set before cutting the blades. Stitch together as per instruction then simply square it up
    patchy-at-best is offline  
    Old 05-25-2014, 06:22 PM
      #10  
    Super Member
    Thread Starter
     
    Join Date: Nov 2010
    Location: Cadillac, MI
    Posts: 6,487
    Default

    Originally Posted by patchy-at-best
    To avoid applique or curved piecing, add a wide strip of black to the strip set before cutting the blades. Stitch together as per instruction then simply square it up
    I like that idea. The seams would give some interest to that large black area.
    irishrose is offline  
    Related Topics
    Thread
    Thread Starter
    Forum
    Replies
    Last Post
    NakeyToes
    Main
    2
    05-06-2013 02:22 PM
    quilterella
    Pictures
    180
    12-13-2011 03:53 AM
    paintedquilt
    Main
    2
    09-19-2010 01:29 PM
    mpeters1200
    Main
    9
    06-25-2007 04:52 AM

    Posting Rules
    You may not post new threads
    You may not post replies
    You may not post attachments
    You may not edit your posts

    BB code is On
    Smilies are On
    [IMG] code is On
    HTML code is On
    Trackbacks are Off
    Pingbacks are Off
    Refbacks are Off


    FREE Quilting Newsletter