
D9P Sliced and Diced
 01-31-2011, 04:43 AM
#51
Super Member
Join Date: Jul 2010
Location: Glenmoore, PA
Posts: 7,941
Originally Posted by nance-ell
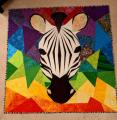
I wasn't planning to share this until it was complete, but I'm so happy with it I want others to see it too!
This is the project on my wall (finally found an old plastic tablecloth and tacked it to the wall; dh wasn't happy. lol). I thought I was going to do a D9P which I expected to be pretty fast and easy to put together. I cut the fabric from fat quarters in 8 inch strips because I wanted to preserve an 8 inch run in a few of the fabrics (ended up being unnecessary and I have a lot of waste, but live and learn!). When I laid out the D9P, it was okay, but I wasn't wowed!
Soooooo, I sewed my D9P blocks rights sides together and cut point to point in both directions. Yippee! Now I love it, but no quilt police allowed. Everything doesn't line up perfectly, but it's busy enough to not be noticable.
Now for my dilemma: I expected to do a small lap quilt or throw. I have completed the block in the upper left corner of the photo and it's 14 1/2 inches square, so I have a 56 inch complete design area without borders. Now I'm thinking of adding borders and/or some sashing....or maybe turning these blocks on point and adding filler squares to make it bigger. Just curious what others think would be the best way to go.

 01-31-2011, 06:15 AM
#55
Super Member
Join Date: Aug 2010
Location: Michigan Thumb
Posts: 1,956
This new version is the best by far of the D9P. We will know who introduced it to us way before it is printed in any magazine. One reason this group beats a magazine--hands down.
Love your fabric choices and can't wait to see the finished top.
Love your fabric choices and can't wait to see the finished top.
 01-31-2011, 06:28 AM
#58
Super Member
Join Date: Aug 2010
Location: North Central, NC
Posts: 2,741
Originally Posted by nance-ell
Originally Posted by sunkistmi
This quilt is absolutely beautiful. Can someone tell me what a D9P stands for? I can see the difference after it has been "sliced & diced" but wonder how to do original pattern also. It looks interesting and pretty easy to do. Thanks
I started by making a 9 patch of 8" squares. Random fabric selection. Cut them in both directions down the center. If you rearrange them at this point, you have a D9P. Do a search on here and you'll find lots of beautiful examples. I just went another step to get the look I was wanting.
I did take some pics along the way if anyone wants to see the process.
Yes, please, I would love to see some photos of your process. I have made a couple of D9P but I really like what you have done with the blocks. Just not sure I completely understand what you did with the D9P to make them look like this. I have an idea but would really like to see the process in photos. Thanks if you can do so.


Thread
Thread Starter
Forum
Replies
Last Post
craftybear
Links and Resources
12
09-03-2011 03:41 PM
AngieS
Main
48
06-14-2011 08:31 PM
