
Didn't make quilt top big enough. Need advice on enlarging!
 11-13-2013, 04:47 PM
#1
Senior Member
Thread Starter

Join Date: Jul 2012
Location: Shubuta, Mississippi
Posts: 465
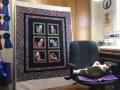
Here is the quilt top I started. It is 33.5 inches by 40 inches. It is my first attempt using the twister tool and I really had no idea how many squares to use to get one large top. I really want something about 55 x 70. Attached is additional fabric I have purchased. I thought about framing it with the twister squares and white on all 4 sides then sashing and binding with the yardage. I thought about cutting the additional squares in half, sewing together in narrow strips and framing around the existing middle, or just simply sewing the squares into strips and framing the middle...help me figure something out! Majority rules!!
 11-13-2013, 04:53 PM
#2
Senior Member
Join Date: May 2010
Posts: 947
Consider making a bunch more twister blocks? You could add scrappy twister bits even with the white deal you've got going there-- it would end up feeling like an internal frame effect and could look kind of cool.
It's very much a matter of taste, but I personally don't like wide borders or multiple borders on a smaller quilt -- to me they look out of proportion and detract from the design. If you're not inclined to make it bigger with more twisters, I'd seriously consider just accepting that this is a wall or table topper size and embracing it as is.
It's very much a matter of taste, but I personally don't like wide borders or multiple borders on a smaller quilt -- to me they look out of proportion and detract from the design. If you're not inclined to make it bigger with more twisters, I'd seriously consider just accepting that this is a wall or table topper size and embracing it as is.
 11-13-2013, 08:15 PM
#4
Power Poster
Join Date: Mar 2009
Posts: 15,639
I would make a border from twisters using the same white fabric at the edges. Then, if it still isn't big enough, repeat the twister border but a little wider that time. Like RST said, it will be self-framing.
11-13-2013, 09:08 PM
#5
Super Member

Join Date: Aug 2010
Location: S. W. Indiana
Posts: 7,484
Here is the quilt top I started. It is 33.5 inches by 40 inches. It is my first attempt using the twister tool and I really had no idea how many squares to use to get one large top. I really want something about 55 x 70. Attached is additional fabric I have purchased. I thought about framing it with the twister squares and white on all 4 sides then sashing and binding with the yardage. I thought about cutting the additional squares in half, sewing together in narrow strips and framing around the existing middle, or just simply sewing the squares into strips and framing the middle...help me figure something out! Majority rules!!
11-14-2013, 02:21 PM
#6
Power Poster

Join Date: Dec 2009
Location: Outside St. Louis
Posts: 38,224
I would use the fabric you wanted to use for the border to make more twister blocks. Or try using that fabric and scraps to make a piano key border all around and then do more borders that match the colors in the center. Strips for piano key border could be up to 8" or so.
11-14-2013, 02:32 PM
#7
Power Poster
Join Date: Mar 2013
Location: Corpus Christi, Tx.
Posts: 16,105
Ditto what RST stated. You could also throw some pinwheels in since they're kind of a take on twisters.
Consider making a bunch more twister blocks? You could add scrappy twister bits even with the white deal you've got going there-- it would end up feeling like an internal frame effect and could look kind of cool.
It's very much a matter of taste, but I personally don't like wide borders or multiple borders on a smaller quilt -- to me they look out of proportion and detract from the design. If you're not inclined to make it bigger with more twisters, I'd seriously consider just accepting that this is a wall or table topper size and embracing it as is.
It's very much a matter of taste, but I personally don't like wide borders or multiple borders on a smaller quilt -- to me they look out of proportion and detract from the design. If you're not inclined to make it bigger with more twisters, I'd seriously consider just accepting that this is a wall or table topper size and embracing it as is.
11-14-2013, 02:36 PM
#8
Super Member
Join Date: Sep 2011
Location: Washington
Posts: 4,001
11-15-2013, 11:08 AM
#10
Senior Member
Join Date: Mar 2012
Location: Kauai, Hawaii
Posts: 376
Since the Twister tools have become so popular and so many projects have been photographed and shown on QB, many of us are making up our own designs from looking at what others have done.
Made up a design (or perhaps copied someone else's idea from years ago) with my new twister tool -- to make place mats using the midi-twister (6 1/2" blocks). The mats come in at 18 1/2 x 13 3/4" (before quilting/binding) -- BUT -- the sewn squares create a sheet of fabric ready to be cut by the tool which is 30 x 24" (4 x 5 blocks).
Getting ready to teach this as a class at my LQS -- did manage to cut down on the fabric requirements a bit by using border strips all the way around which are 6 1/2 x 4 1/2" -- this could be cut down a bit more by experienced folks, wanted the students to have some leeway.
When I plan now to use my twister tool, after making up the design or working with one already pictured like yours (which is STUNNING by the way), I count the number of blocks in the photograph and instead of multiplying that by my 6" (after seams) block, I use 3 3/4" which is about the size of the finished block after using the tool. This is not an exact amount -- rounded up a little, as if you do the math, my seams are like so many others, not quite all perfect!
You can figure the numbers for the big twister and the mini also! And use those as your guide.
This might help others as they get ready to use their twister tools for Xmas projects. Some tools use more fabric than expected but the time you save in using the tool justifies this, and the pattern is one which you like.

Thread
Thread Starter
Forum
Replies
Last Post
AngieS
Pictures
15
06-22-2011 05:00 AM
