
Help - mosaic tee shirt quilt - need guidance!
 12-16-2011, 03:19 PM
#11
Super Member

Join Date: Apr 2010
Location: Brooktondale, NY
Posts: 1,683
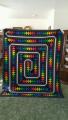
First off you have a great layout, now if it was me( as i hate making mistakes and double hate seam ripping anything.) So I use the mistake as a way to create a new way to fix it. I would maybe rip a 1/2 inch into the seams where i needed to join the fabric, not the whole thing, just right where I needed to sew it on,maybe just a few stitches more. As you have it on a floor that is a grid pattern, with good straight lines use it to line up the left row, place your filler fabric under the tshirt pieces draw the shapes you need, when cutting the filler fabric add the 1/2 inch seam allowance all the way around. does this make any sence(sp) cant find the spell checker. Good luck Guess you can tell Ive made my share of mistakes.
 12-16-2011, 03:35 PM
#12
Senior Member

Join Date: Aug 2011
Location: Munford, Alabama
Posts: 798
I would suggest you follow Linda's advise, rip apart and then make squares. Some squares could have more than one patch. I would stagger the vertical seams, this would alow you to make the squares all the same hight and the widths random.
12-16-2011, 03:59 PM
#13
Member
Thread Starter
Join Date: Dec 2011
Posts: 28
First off you have a great layout, now if it was me( as i hate making mistakes and double hate seam ripping anything.) So I use the mistake as a way to create a new way to fix it. I would maybe rip a 1/2 inch into the seams where i needed to join the fabric, not the whole thing, just right where I needed to sew it on,maybe just a few stitches more. As you have it on a floor that is a grid pattern, with good straight lines use it to line up the left row, place your filler fabric under the tshirt pieces draw the shapes you need, when cutting the filler fabric add the 1/2 inch seam allowance all the way around. does this make any sence(sp) cant find the spell checker. Good luck Guess you can tell Ive made my share of mistakes.
Hoping to have this done by Christmas...THANK YOU!!! Will keep you updated...as I'll prolly be back...
 12-17-2011, 05:25 PM
#15
Super Member

Join Date: Apr 2007
Location: Manhattan, Kansas
Posts: 2,160
I've seen ones where the background is made up of quilt blocks (4 patch or simple log cabin) and then the shirts machine appliqued onto the background. Would this work for you? You could do the applique with the sections you have already sewn together.
Just something to think about.
Just something to think about.
 12-17-2011, 07:52 PM
#18
Senior Member
Join Date: Sep 2011
Location: Central NY
Posts: 627
Now that you have a picture of how you would like it layed out, I really think the best thing to do would be to gently take them apart and choose what others have said let's say a basic block size (just guestimating - 12"). Put together some of the small ones and "filler fabrics" to make up that basic block size. You can easily do it without too much math or work other than the unsewing. You already have a great layout to me that's the hardest part.
12-21-2011, 05:37 AM
#19
Member
Thread Starter
Join Date: Dec 2011
Posts: 28
Thanks Ladies, I've done a bit of combining all your ideas. What I've done, is cut fabric to fit a square, with an extended length on it. Then I am cutting fabric to fit the square opposite of the other one, then I am marrying them in the middle with pins and sew. I will take another pic today when I get it set up. It's looking good. I have do do a little sem ripping to fold in the edges. slow but sure its coming along.

Thread
Thread Starter
Forum
Replies
Last Post
auntpiggylpn
Main
12
07-08-2012 04:26 AM
sueisallaboutquilts
Main
180
05-20-2011 04:46 AM
OnTheGo
Pictures
35
05-16-2011 04:23 PM
MomtoBostonTerriers
Main
25
11-22-2010 09:43 AM
