
Help with "vintage" blocks
 09-20-2018, 08:06 AM
#1
Super Member
Thread Starter
Join Date: Aug 2009
Location: Illinois
Posts: 1,825
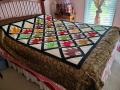
Oh, Help! I have found at least 20 blocks that my mother made probably about 1970. I'd like to put them together but unfortunately she did not put the pattern with them. Recently someone posted Jack's Chain and the blocks certainly resemble that pattern. The blocks she left are hexies surrounded by 6 4" 9 patches alternating with triangles. All of the 9 patches on each block match. There are considerable 9 patches individually made but using them will make the alternate rings not consistent with the matching she did on the wheels. How do I put these together? I see that Fons and Porter may have called this Rock Around the Block but both Jack's Chain and RAB are not quite what I have to work with. Maybe they will go back in a box?!
Last edited by QuiltnNan; 09-20-2018 at 09:11 AM. Reason: shouting/all caps
 09-20-2018, 08:25 AM
#2
Super Member
Join Date: Aug 2018
Location: Greater Peoria, IL -- just moved!
Posts: 6,183
I had to google that Jack's Chain -- Oh my goodness! What a fantastic (and daunting!) project.
The way I work I would probably consider appliqueing the blocks onto square backings. With a hex, two sides will be parallel to each other. When you put them together the parallel 9 patches will meet, and the backgrounds should form into stars. If you do have 20 blocks, that is 4x5 so a nice layout. (edit for clarity I hope: The 9-patches will be in the center top and bottom of the new block layout, the original sides will be pointed, the new square background will be a V shape that will form into 4 pointed stars)
If slightly less/more, you can use the finished 9-patches to make a filler block or two. When I work with vintage blocks I try very hard to not add much to them and I do all my additions with a different colored thread and if I have to add fabrics I keep them consistent with what is in the top, but clear where mine are, so for example if I had to make 4 blocks I'd put them in the corners and use the same fabrics in them.
With the individual 9-patches you could put them into sashing, but you would lose the all-over stars from the background. If they are all identical you might want to take the center rows apart for narrow sashing, matching those center rows to the parallel 9-patch blocks so you get the correct light/dark sequences. Or I'd make them into a border or a top/bottom row depending on how many you have, but I'd use them in the same project, on the back if necessary. (My current vintage project is a tiny little hex grandmother's flower garden I got at the goodwill for $6.00! It was huge but one row was only 9 blocks while the others were 10-11. I took off the 9 block row and will put those hexes on the back.)
The nice thing is that you don't have to do anything with them right away. Inspiration may or may not strike, but either way you will be thinking of your mother.
Last edited by Iceblossom; 09-20-2018 at 08:34 AM.
09-20-2018, 01:15 PM
#4
Super Member
Thread Starter
Join Date: Aug 2009
Location: Illinois
Posts: 1,825
I don’t know how to post pictures. Second best is for you to find Jack’s Chain online and it it the wheel looking block with all the 9 patches on each wheel matching but each wheel being different. Is that clear as mud?
Ha—- quiltnNan caught my help in caps when I posted this. But the help was very sincerely expressed as shouting! Frustration was setting in.
I may use iceblossums idea of appliqu�ing these on background but sounds like a lot of work. Eliminates the Y seams though! I want to hand quilt this. Will it be difficult with that extra layer of fabric? I’ll be using a low loft poly batt. Would a poly blend back make the quilting easier?
09-20-2018, 01:25 PM
#5
Super Member
Join Date: Aug 2018
Location: Greater Peoria, IL -- just moved!
Posts: 6,183
For my idea of appliqueing, the parallel 9-patch blocks would be even with the foundation block and sewn into the seams between blocks. That eliminates a tiny bit of the hand work! You could certainly center the hex units on an oversized block as well.
I don't do a lot of applique and no hand quilting at all, so no help from me there. Most of my hand quilting friends prefer cotton or wool batting and 100% cotton back.
I don't do a lot of applique and no hand quilting at all, so no help from me there. Most of my hand quilting friends prefer cotton or wool batting and 100% cotton back.
09-20-2018, 01:47 PM
#6
Super Member
Join Date: Jun 2010
Location: The Deep South near Cajun Country, USA
Posts: 5,435
09-22-2018, 03:37 AM
#9
Super Member
Join Date: Apr 2010
Location: Northeastern Indiana
Posts: 2,800
Let me see if I can walk someone through the picture deal.
1. take a picture of whatever it is with your smart phone.
2. email that picture using "share" to yourself and it will show up on your computer. You must "resize" the picture to get it to fit. I resize mine to smallest.
3. find something that says "save" or save as. Mine says with attachment.
4. when I save it, there is a 6 digit number that pops up with it.
5. make a not in your picture notebook of the number and what the picture is
6. open quilt forum and look at the top bar and find a little square with a tree inside.
7. hit the tree in a box and a couple of boxes show up. There is one particular box, experiment around. This box wants to know when the picture was taken and the answer is "2018". From the 2018 I get a list and the newest picture is going to be at the bottom.
8. make sure you are in quilt forum when you put the 2018 in and then highlight the correct 6 digit number. Have patience and wait for the picture to populate in the quilt forum. Then you can type any information you want and it will show up in the post.
I hope this helps someone. We all benefit a great deal from pictures.
Marcia
09-22-2018, 04:25 AM
#10
Super Member
Thread Starter
Join Date: Aug 2009
Location: Illinois
Posts: 1,825

Thread
Thread Starter
Forum
Replies
Last Post
bearisgray
General Chit-Chat (non-quilting talk)
65
02-01-2024 09:04 AM
bearisgray
General Chit-Chat (non-quilting talk)
21
05-09-2017 05:30 PM
