
How do you do this mug rug?
 03-25-2019, 03:14 PM
#1
Super Member
Thread Starter
Join Date: Mar 2016
Posts: 2,853
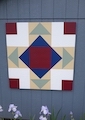
I've looked for a pattern for this mug rug, but to no avail. It's pretty simple, but what I'm not sure of, is how to cut the batting so that you don't get a lump on the edge after it's turned. I don't actually know what that edge is called, so didn't know how to search for instructions.
bkay
https://www.flickr.com/photos/153123...-KwHXkm-e7UTD4
bkay
https://www.flickr.com/photos/153123...-KwHXkm-e7UTD4
 03-25-2019, 03:27 PM
#2
Super Member

Join Date: Nov 2011
Location: South West Ontario
Posts: 2,237
Cute project -
I think if you trim the batting close to the stitch line once you've sewn it, it should turn easily. They look like they're done "pillowcase" style - stitch both edges leaving a space for turning, trim, clip the curves and turn right side out. Turn the unstitched edges in and stitch closed.
The strips look like they're sewn and flipped in a quilt as you go method.
Edited to add - a final edge/top stitching too!
03-25-2019, 05:28 PM
#4
Power Poster
Join Date: Mar 2011
Location: Ontario, Canada
Posts: 41,501
I would construct the top strips with one strip towards the bottom with an opening for turning. That way you could put right sides together on top of batting, sew the whole shape, trim and turn out between the strips. I would then invisible ladder stitch the seams between the strips closed.
03-25-2019, 06:00 PM
#5
Super Member
Join Date: Jul 2013
Location: Houston, TX
Posts: 9,608
I'd also do it the way GEMRM describes, although I do like Tartan's idea also. The edges are edgestitched and topstitched. You'll probably have to do them separately because if you use a double needle the bobbins thread on the back zigzags.
 03-26-2019, 06:35 AM
#8
Super Member
Thread Starter
Join Date: Mar 2016
Posts: 2,853
I don't want to bind it. I think the look of this particular design would look better without binding.
I found a tutorial online, but it also leaves out some info, unless you are not going to quilt it at all. I can't find the site again, but what they did was cut the batting 3/8 inch smaller than the top (should have bookmarked it). However, that would be hard to turn without the batting being attached.
I suppose you could quilt the batting to the top, then add the backing and turn, pillowcase style. I like Tartan's idea of leaving a turning space on the seam line.
I've revised my search criteria. I will just search for mug rugs without binding.
Thanks for the help.
03-27-2019, 05:42 AM
#9
Super Member
Join Date: Aug 2010
Location: Hamburg,Western New York State
Posts: 4,856
I would construct the top strips with one strip towards the bottom with an opening for turning. That way you could put right sides together on top of batting, sew the whole shape, trim and turn out between the strips. I would then invisible ladder stitch the seams between the strips closed.
03-27-2019, 07:06 PM
#10
Member
Join Date: Nov 2011
Posts: 97
Cute! I found several links to a tutorial and one said it included pattern pieces, but apparently the site’s been hijacked...link takes me to a page with a bizarre address and a survey that purports to reward you with something too good to be true. Sigh. This sort of thing drives me crazy.
I think you’ve gotten good advice on construction, but those edges are always pesky when batting is involved. I’m making microwave bowl cozies, and it is really hard to not have a bulgy edge if fabric and batting are cut the same size. Cutting the batting smaller works, but I’m not at all confident that it will stay in place in the long run. Hopefully, the stitching on the outside will keep it where it belongs.
If anyone who has the tutorial should contact you with a real address, would you please share it?
Good luck!

Thread
Thread Starter
Forum
Replies
Last Post
craftybear
Links and Resources
5
09-18-2011 10:25 PM
craftybear
Links and Resources
9
09-18-2011 06:56 PM
craftybear
Links and Resources
7
05-01-2011 11:50 PM
