
Margin of Error Question

 06-19-2014, 12:50 PM
#32
Member
Join Date: Jun 2014
Location: east side, NM
Posts: 37
I think for this quilt you are just fine...as long as you are consistantly a little off of 1/4". The suggestions above for helping you maintain a 1/4" seam are very good. I have used the sticky notes myself.
I also have used a magnetic seam guide, but only if you don't have a computerized machine.
I also have used a magnetic seam guide, but only if you don't have a computerized machine.
They are inexpensive as well.
06-19-2014, 01:15 PM
#33
Super Member
Join Date: Mar 2010
Location: New Hampshire & Maine
Posts: 3,300
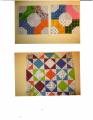
Looks good to me. A suggestion for your next row (so you don't have to worry about matching seams)...offset the blocks. By this I mean sew the next row with the seam at the half way point of your blocks. (Your new row seams should be in the centers of the first row blocks). Next row, sew your seams like your first row. Next row, sew like row #2. Continue...
Clear as mud???
Clear as mud???
 Skylark, your row looks fine to me.
06-20-2014, 05:11 PM
Skylark, your row looks fine to me.
06-20-2014, 05:11 PM
#35
Junior Member
Thread Starter
Join Date: Mar 2014
Location: USA
Posts: 174
Great advice here, many thanks! I've completed two rows, and lined them up - perfect no, but not as off as I thought it would be....And since I am tying the quilt, and plan to do it at that corners with the "tuft" of thread on the top side, that should also serve to hide things some 
My next issue will be to see how "straight" the strips are! They didn't look too bad but I should probably sew these two strips together and see what I get before I continue!
@CorgiNole - I ordered that seam guide from Nova - I figure that will come in handy for future projects. I had tried magnets before but for some odd reason they really didn't seem to stick on my machine? Maybe they just weren't strong enough. Anyways, I think that will be a big help. My other machine, a 70's era Kenmore is what I'm going to use to sew the pieced rows together and that I don't mind taping a credit card to!
@sherryl1 - I think I'm hesitant somewhat because it is a family heirloom and also because I do work in a museum and thus shudder at the thought of putting tape on antiques haha. I'm sure it would be fine but I'd be too worried it wouldn't be.
@AngeliaNR - I think I might try that, sewing them in 4 block squares for the next two rows, and see how it goes.
For the staggering/offset suggestions - those are good ideas too. I'd consider that if I hadn't already sewn two rows and spent hours on the layout getting the colors spread out. But may end up doing that if things go any further South for me haha.
My next issue will be to see how "straight" the strips are! They didn't look too bad but I should probably sew these two strips together and see what I get before I continue!
@CorgiNole - I ordered that seam guide from Nova - I figure that will come in handy for future projects. I had tried magnets before but for some odd reason they really didn't seem to stick on my machine? Maybe they just weren't strong enough. Anyways, I think that will be a big help. My other machine, a 70's era Kenmore is what I'm going to use to sew the pieced rows together and that I don't mind taping a credit card to!
@sherryl1 - I think I'm hesitant somewhat because it is a family heirloom and also because I do work in a museum and thus shudder at the thought of putting tape on antiques
haha. I'm sure it would be fine but I'd be too worried it wouldn't be.@AngeliaNR - I think I might try that, sewing them in 4 block squares for the next two rows, and see how it goes.
For the staggering/offset suggestions - those are good ideas too. I'd consider that if I hadn't already sewn two rows and spent hours on the layout getting the colors spread out. But may end up doing that if things go any further South for me haha.
06-22-2014, 01:10 PM
#36
Super Member
Join Date: Jul 2010
Posts: 6,430
You can also use a full pack of Post-it note and align it along your presser foot on the 1/4"line. Press your fabric against the "bridge" or "dam" that the post-it pack makes. Let the fabric ride along the pack until you have sewn the seam. It should be straight and consistent.

Thread
Thread Starter
Forum
Replies
Last Post
