
My first try at a Hunter's Star block
 07-02-2017, 10:36 AM
#31
Super Member
Join Date: Jul 2010
Location: England, U.K.
Posts: 1,588
Nice link to the tutorial - thank you for sharing. Your block has turned out really well - love blue and white.
We are hoping to visit Texas later this year ( near Dallas ) really looking forward to coming back and seeing our British friends.
We are hoping to visit Texas later this year ( near Dallas ) really looking forward to coming back and seeing our British friends.


 07-02-2017, 11:54 AM
#34
Super Member
Join Date: Oct 2010
Location: howell, Mi
Posts: 2,345
Love everything about your block. The colors are wonderful. At first I thought the red was just marking where the flange is, But it is a wonderful idea. You are well on your way to being a "master" quilter. Your points are perfect. Keep up the good work.
Sue
Sue
07-03-2017, 08:37 AM
#36
Super Member
Thread Starter

Join Date: Apr 2011
Location: Texas
Posts: 5,546
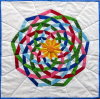
Thanks for all the compliments on the block. I did make another one on Sunday & it turns out that it is a 9 1/2" unfinished block...so mine was close.  I checked Roolen's original blog where she posted the directions in 2009 and she said it was a 9" x 9" finished block (without seams). I'm thinking if I make a full lap quilt like that I might put a small red sashing between each block. How do you think that would look? It's hard for me to visualize things like that. Maybe someday I'll invest in EQ7 so I can see things before I actually make them. For the time I will just use my design wall to audition what looks best.
I checked Roolen's original blog where she posted the directions in 2009 and she said it was a 9" x 9" finished block (without seams). I'm thinking if I make a full lap quilt like that I might put a small red sashing between each block. How do you think that would look? It's hard for me to visualize things like that. Maybe someday I'll invest in EQ7 so I can see things before I actually make them. For the time I will just use my design wall to audition what looks best.
 07-03-2017, 12:04 PM
#39
Super Member
Thread Starter
Join Date: Apr 2011
Location: Texas
Posts: 5,546
Oh WOW, Peggi, that is awesome. My blocks will have a blue border around each one with a 1/4" red flange next to the block. So one entire block would consist of ... 9" block...1/4" red flange...3" blue border. I was thinking instead of sewing each block together like that maybe I should have a separation of red sashing between each block since each block will have a blue border around it. Does that make sense? Can you show me something like that? Also, could I see it on point? I love quilts on point. Thank you, thank you.
07-03-2017, 01:00 PM
#40
Super Member
Join Date: May 2011
Location: Pacific NW
Posts: 9,563
How about something like this? The hunter star block is 9", the red around each block is .25", and the sashing is 3".
[ATTACH=CONFIG]575791[/ATTACH]
I put the blue border as a 3" sashing because I thought that a 3 inch border around each block (which equals a 6" sashing) would sort of overwhelm the 9" blocks, even if you did put the red inbetween each border.
If you sew this up, I recommend sewing the block first, then your 1/4" red border, then a 1.5" blue border around each block. Then sew your blocks together in rows. This is much, much easier than trying to line up long sashing strips

Thread
Thread Starter
Forum
Replies
Last Post
