
Need help putting this block together
 01-18-2011, 12:25 PM
#1
Super Member
Thread Starter

Join Date: Mar 2010
Location: Canada
Posts: 3,458
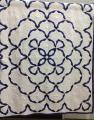
I downloaded the pattern and templates but there are no instructions. How on earth do I put this together? Are there Y-seams involved? Please help.
http://www.quiltmag.com/resources/12...c-stash-block/
http://www.quiltmag.com/resources/12...c-stash-block/
 01-18-2011, 12:31 PM
#3
Super Member
Join Date: Apr 2009
Posts: 3,382
I would strip piece it similar to a log cabin block. Start with the center. Then add a strip of the triangle color and trim into a triangle. Then add 1 of the longer strips and trim flush at the ends. The outside corner triangles go last.
01-18-2011, 12:38 PM
#4
Super Member
Thread Starter
Join Date: Mar 2010
Location: Canada
Posts: 3,458
Originally Posted by mytwopals
I would strip piece it similar to a log cabin block. Start with the center. Then add a strip of the triangle color and trim into a triangle. Then add 1 of the longer strips and trim flush at the ends. The outside corner triangles go last.
See what I mean? Or am I missing something?
01-18-2011, 12:40 PM
#5
Power Poster
Join Date: Oct 2009
Location: Idaho
Posts: 11,375
Originally Posted by mytwopals
I would strip piece it similar to a log cabin block. Start with the center. Then add a strip of the triangle color and trim into a triangle. Then add 1 of the longer strips and trim flush at the ends. The outside corner triangles go last.
01-18-2011, 12:42 PM
#6
Power Poster
Join Date: Oct 2009
Location: Idaho
Posts: 11,375
Originally Posted by EasyPeezy
Originally Posted by mytwopals
I would strip piece it similar to a log cabin block. Start with the center. Then add a strip of the triangle color and trim into a triangle. Then add 1 of the longer strips and trim flush at the ends. The outside corner triangles go last.
See what I mean? Or am I missing something?
01-18-2011, 12:46 PM
#7
Super Member
Join Date: Mar 2010
Location: New Hampshire
Posts: 4,555
You don't have to do a Y seam, but you will have to do a partial seam.
With the pink triangles, sew each one on half way (does not have to be an 'exact' stopping point.) Do all four pink triangles like this.
Now go back to any triangle. Lift up the edge that is unsewn, lay the rectangle strip down under it along the focus fabric, and sew that rectangle down along the focus fabric and along the edge of your triangle. Then you will just have to finish the triangle seams where you stopped.
01-18-2011, 12:51 PM
#8
Super Member
Thread Starter
Join Date: Mar 2010
Location: Canada
Posts: 3,458
Originally Posted by JenniePenny
You don't have to do a Y seam, but you will have to do a partial seam.
With the pink triangles, sew each one on half way (does not have to be an 'exact' stopping point.) Do all four triangles like this.
Now go back to any triangle. Lift up the edge that is unsewn, lay the rectangle strip down under it along the focus fabric, and sew that rectangle down along the focus fabric and along the edge of your triangle. Then you will just have to finish the triangle seams where you stopped.
01-18-2011, 12:55 PM
#9
Banned
Join Date: Dec 2009
Location: Enid, OK
Posts: 8,273
I checked out that PDF and there are NO directions for this block...so I left them a comment about it..maybe they will send the directions...
either way, this is not an easy block...if you have never done partial seams, they are much like a Y seam and tricky!
either way, this is not an easy block...if you have never done partial seams, they are much like a Y seam and tricky!

Thread
Thread Starter
Forum
Replies
Last Post
carolaug
Links and Resources
1
02-06-2011 03:47 AM
finch
Links and Resources
3
11-14-2010 02:19 PM
