
OBW Progress--I Think I'm In A Pickle--used flat point ruler
 10-27-2012, 02:55 PM
#1
Senior Member
Thread Starter
Join Date: Aug 2011
Location: The California Hills
Posts: 626
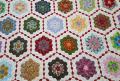
I got all my hexagons sewn and arranged on my design wall. I am pretty happy with the patterns that emerged and was farily successsful in cascading them down the quilt in a diagonal fashion like I was imagining. Overall, I like the results but the fabric probably isn't ideal for this type of quilt as it has too many small details instead of large multi-shaded shapes.
I realized about half way in that I think I may have bought a ruler that is not ideal. It is flat at the top point so when you sew the 3 pieces together to form half of the hexagon, you have a flat edge (see the photo). Now, how do I match up the rows and make sure the center of my hexagons are lined up and sewn so they meet in the center?? I have the book and looked at online tutorials and I think you use the dog-ears of the points to line up the triangles properly but I don't have any dog-ears at the center point. What should I do?
I realized about half way in that I think I may have bought a ruler that is not ideal. It is flat at the top point so when you sew the 3 pieces together to form half of the hexagon, you have a flat edge (see the photo). Now, how do I match up the rows and make sure the center of my hexagons are lined up and sewn so they meet in the center?? I have the book and looked at online tutorials and I think you use the dog-ears of the points to line up the triangles properly but I don't have any dog-ears at the center point. What should I do?
 10-27-2012, 02:58 PM
#3
Senior Member
Thread Starter
Join Date: Aug 2011
Location: The California Hills
Posts: 626
Here is the original fabric. I have been planning on using the matching coral fabric for the border but I'm not sure now that I see the fabric next to the quilt. I may need to go with something that is closer to the medium red from the flowers. I'll have to see if that fabric line has something like that.
 10-27-2012, 03:07 PM
#6
Power Poster
Join Date: Dec 2008
Location: Western Wisconsin
Posts: 12,930
What I would do is pin and glue-baste the seams before sewing. Place on ironing board, stick a pin straight down through the intersections on each piece, add a small dot of Elmer's washable white school glue in the seam allowance, press with iron to dry the glue, remove pin. This has been the most accurate way I have found to match seams and, with no pins in the way, it's easy to sew.
10-27-2012, 03:30 PM
#7
Power Poster
Join Date: Dec 2010
Location: Michigan
Posts: 11,276
Love the coral color!!!
Yes, the dog ears do make it easier to match, but you should be OK. Put pin from the back of the block thru the intersection where the 3 triangles intersect. Should be about a quarter inch from the flat part. Now take the same pin and stick it into the seam intersection of the matching hex, with right sides together and secure the 2 pieces with more pins or glue. I would do this on a practice hex and then use a long stitch length to baste them together and verify everything will fit.
Yes, the dog ears do make it easier to match, but you should be OK. Put pin from the back of the block thru the intersection where the 3 triangles intersect. Should be about a quarter inch from the flat part. Now take the same pin and stick it into the seam intersection of the matching hex, with right sides together and secure the 2 pieces with more pins or glue. I would do this on a practice hex and then use a long stitch length to baste them together and verify everything will fit.
10-27-2012, 03:40 PM
#8
Senior Member
Thread Starter
Join Date: Aug 2011
Location: The California Hills
Posts: 626
Is there a way to fill in the "open" triangle area on the sides? I was thinking of filling it in with whatever I use as border fabric maybe. What type of triangle template would I need and is it hard to do?

Thread
Thread Starter
Forum
Replies
Last Post
lindamar
Main
18
09-20-2011 06:50 AM
bearisgray
General Chit-Chat (non-quilting talk)
5
04-30-2011 04:46 AM
frugalfabrics
General Chit-Chat (non-quilting talk)
5
01-17-2011 10:21 PM
