
Paper piecing and really tight inner curves
 07-28-2014, 09:05 AM
#1
Junior Member
Thread Starter

Join Date: Jan 2013
Location: Finger Lakes region
Posts: 188
I have recently finished my first king sized paper pieced quilt and liked the results well enough to go full tilt and make a really complicated quilt using variations on a New York beauty pattern. It has a ton of very very tight inside curves and requires small arched V shaped fabrics to be sewn into that tight curve to complete each block. Ultimately when this is completed it looks like colorful pieced "worms" intertwined on a black background. This might sound hideous but it is actually quite striking! Because the grain of the fabrics is frequently random and with a lot of "give"...should you baste inner curves, aggressively clip the outer curve of the piece to be added, then pin, pray and sew or is there a general rule of thumb that as a relatively new quilter, who mostly learns from utube, needs to know ? Any and all tips, tricks and techniques would be greatly appreciated!

 07-28-2014, 10:04 AM
#3
Super Member
Join Date: May 2011
Location: Pacific NW
Posts: 9,585
I have never seen a paper-piecing pattern with actual curves. The very nature of paper does not allow it to curve with the seam. In my experience, paper-piecing "curves" is actually piecing many narrow, angled pieces that give the appearance of being curved, but are actually straight.
07-28-2014, 10:12 AM
#4
Power Poster

Join Date: Mar 2009
Location: Lake Elsinore, CA
Posts: 15,266
I have never seen a paper-piecing pattern with actual curves. The very nature of paper does not allow it to curve with the seam. In my experience, paper-piecing "curves" is actually piecing many narrow, angled pieces that give the appearance of being curved, but are actually straight.
07-28-2014, 10:57 AM
#5
Power Poster
Join Date: May 2009
Location: NY
Posts: 10,590
I have done what the OP is suggesting
I removed the paper foundation for the spiky portion before sewing it to the inner tight curve. I pinned, pinned, pinned with the concave portion on top. I did not baste. Once the inner curve was on, I sewed the outer curve same way, concave on top and many pins.
I removed the paper foundation for the spiky portion before sewing it to the inner tight curve. I pinned, pinned, pinned with the concave portion on top. I did not baste. Once the inner curve was on, I sewed the outer curve same way, concave on top and many pins.
07-28-2014, 01:14 PM
#6
Super Member

Join Date: Aug 2009
Location: Canberra, Australia
Posts: 2,135
On smaller curves I also like to handsew them together, the stitches don't have to be neat, I sew just to the left of the sewing line so that I don't sew over the hand stitching and it makes it easier to remove. I find it so much easier to get a good finish rather than just pinning.
07-28-2014, 01:42 PM
#7
Junior Member
Thread Starter
Join Date: Jan 2013
Location: Finger Lakes region
Posts: 188
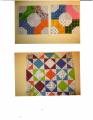
This the actual design by Jacqueline DeJonge. The inner circles are done in three sections and connected with Y seams. Sorry for such a small picture...no idea how to scale it for better viewing.
[ATTACH=CONFIG]485377[/ATTACH]
[ATTACH=CONFIG]485377[/ATTACH]
07-28-2014, 02:31 PM
#8
Power Poster
Join Date: Jun 2011
Location: Southern California
Posts: 19,127
WOW that is one intricate New York Beauty with three dimensional cubes in the background. My next project is Island Sunrise by Judy Niemeyer and it is just the traditional New York Beauty done with PP.

Thread
Thread Starter
Forum
Replies
Last Post
