
quick and easy way to cut tshirts for a quilt
 05-02-2019, 09:15 AM
#1
Senior Member
Thread Starter

Join Date: Jul 2012
Location: Shubuta, Mississippi
Posts: 465
I am going to make another t-shirt quilt and was wondering if there is a quicker way to cut the t-shirts to get exact squares/rectangles with the picture/saying in the middle? Last time I just measured and cut and ended up a little wonky but I really want this one to be more perfect as far as the squares go.
thanks, Terina
thanks, Terina
 05-02-2019, 09:40 AM
#2
Super Member
Join Date: Aug 2018
Location: Greater Peoria, IL -- just moved!
Posts: 6,182
Do you put on your interfacing on first extra large and then trim it down from there? In my case if I want a 10.5" cut square, I cut the interfacing at 12" and the fabric is still overlapping that.
I have a large variety of rulers to help me, but just last weekend at the goodwill I found a EM (easy mark) Grid package for cheap just in case I ever make another t-shirt quilt.
I do quite a bit of general fussy cutting and buy the large pieces of clear grided template plastic to use as templates/positioning. Be warned in advance, it is too thin to use as a ruler guide! Place the template, then your ruler along the template edge, remove the template to cut.
05-02-2019, 10:10 AM
#3
Power Poster
Join Date: May 2009
Location: NY
Posts: 10,590
The first thing I do is cut all of the T-shirts in half along the sides so I have a nice flat front and back. I usually cut around the sleeves to completely remove them from both halves. Unlike most, I interface after I cut out the T-shirt emblem instead of before. I lay the T right side up on my cutting board. I use my 12 /12" square up ruler to center the design as best I can, sometimes they can't be perfectly centered because then you are up into the ribbed neck hole of the T and you really want to cut below the neck line seam. I then cut out the imprint at 12 1/2 (or whatever size I need/want) then transfer to my ironing board and put on the interfacing which I have precut to size.
05-02-2019, 10:55 AM
#4
Super Member
Join Date: Sep 2018
Location: Houston, AK
Posts: 2,126
MSQC Just has a Missouri Star Live that showed some tips for t-shirt quilts. Here is the link - https://m.youtube.com/watch?v=1G3yA-olXF8. Of course, they are advertising a ruler for it but you could certainly use your own.
Last edited by MicheleC; 05-02-2019 at 10:55 AM. Reason: Missing word
05-04-2019, 02:28 AM
#5
Junior Member
Join Date: Jul 2011
Location: The Villages, FL
Posts: 149
I bought a set of square rulers. 12.5,13.5,14.5 & 15.5 size. I saw them a a large quilt show.
Best thing ever for making tee shirt quilts. Made by Trish Bowman. Web site is her name plus .com.
Hope this helps.
Best thing ever for making tee shirt quilts. Made by Trish Bowman. Web site is her name plus .com.
Hope this helps.
05-04-2019, 05:54 AM
#8
Senior Member
Join Date: Dec 2017
Location: SW Michigan
Posts: 487
Same as most of the other responses -- the quickest tee shirt quilt will have all the tee shirts cut the same size.
I free cut the shirt to remove the sleeves and separate the front from the back. I interface with the interfacing slightly larger than the final cut. I use a 12.5 cutting ruler so I can exactly see how the tee shirt will be centered, etc. And, my rotating cutting mat really comes in useful for tee shirt cutting. I think the real key is using a ruler the size you want it to cut. It allows you to make sure the design is centered and holds the whole shirt down flat.
Good luck -- you are making a wonderful memory for someone!
Last edited by QuiltnNan; 05-04-2019 at 06:29 AM. Reason: shouting/all caps
05-04-2019, 06:17 AM
#9
Super Member
Join Date: May 2012
Location: Central Wisconsin
Posts: 4,391
I had some crazy necklines that I really wanted to use and this method made that possible. One had the entire neckline, front and back, with a different color behind it. Pink for skin? I used gray.
05-04-2019, 03:48 PM
#10
Super Member
Join Date: Mar 2010
Location: Upstate NY, north of Syracuse Area
Posts: 6,003
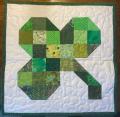
I also cut the front away from the rest of the shirt, unless I am going to want to use some of the backs when I need extra to fill in spaces. I also use any motifs printed on the back and sleeves. I never seem to be able to get all the blocks the same size as I am not willing to chop off parts of the design. I use the smaller pieces to fill in spaces in the quilt layout. If the motif requires me to use part of the neck ribbing, I just include it in the square. After stitching it to the sashing, it's fine as any other part of the shirt.
Also, if the design is vinyl or rubberized, the foot doesn't glide over smoothly so I tear small strips of waxed paper, perhaps 1" wide. These I use to cover the edge of the design so my sewing foot will glide on the paper and not stick to it. I don't actually sew thru the wax paper, just next to it. I don't usually use stabilizer but instead will use thin muslin or the tops of bed skirts to back my blocks.
I quilt around the designs before sewing them into the quilt and it's much easier doing one block at a time rather than a whole quilt. I use the backing fabric for the quilting layer, not batting.
Sometimes I add sashing as needed to each square to bring them all to one size. This is a quilt in which I used the sashing for that: [ATTACH=CONFIG]612475[/ATTACH]

Thread
Thread Starter
Forum
Replies
Last Post
bbeyes
General Chit-Chat (non-quilting talk)
12
01-19-2015 11:00 PM
craftybear
Links and Resources
10
09-18-2011 07:47 PM
