
Boom 13 "FOUR LEAF CLOVER" 4 Month Group
 07-28-2014, 07:33 PM
#421
Super Member

Join Date: Dec 2011
Location: Disneyland
Posts: 1,719
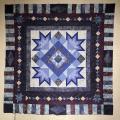
My youngest kitten that I nursed was about 2-3 weeks. Eyes were open but oh so tiny. There was two of them I kept one (Hannah) and she is now 15 1/2 years old. I was worried that I would lose them because they were so tiny but my male cat that I had at the time took real good care of them. He taught them how to use the litter box and let them pretend to nurse from him. He was a great babysitter.
[ATTACH=CONFIG]485449[/ATTACH]
[ATTACH=CONFIG]485449[/ATTACH]
 07-28-2014, 09:13 PM
#422
Senior Member

Join Date: Aug 2011
Location: San Jacinto, Ca
Posts: 558
Glad to see that other people have cutting mistakes as well. I had to alter three blocks this weekend due to cutting errors. Fortunately, they turned out okay. One I was able to keep one the same pattern, one I chose a different pattern and one I just made it up as I went along.
07-29-2014, 04:31 AM
#424
Super Member

Join Date: Nov 2013
Location: Green Valley AZ
Posts: 2,574
One of my favorite things is to go to the picture gallery and see all great work the ones for me and all the other awesome blocks you guys will be receiving too.
07-29-2014, 11:31 AM
#425
Super Member
Join Date: Mar 2009
Location: OFallon, MO
Posts: 2,281
Wow! I just saw my block that Godschild made for me. What a beauty. My DH is sitting behind me at his computer and I showed it to him. He, like I, is amazed at the workmanship that you gals are doing. Makes me want to improve myself.
07-29-2014, 04:53 PM
#426
Super Member
Join Date: Feb 2010
Location: Virginia
Posts: 1,260
I'm not sure if this should go here but a friend sent this to me today and I thought it was worth sharing.
Square Up Those Problem Quilt Blocks
If you receive -- or make -- a block that isn't quite large enough, try pressing it first to see if it grows a bit, since blocks are usually too small, not too large.
If that won't quite do it, or if the patches on the outer edges of the block are a bit skewed or uneven, use this freezer paper method to prep the block for sewing. Gridded freezer paper makes the job easier, but you can work with plain freezer paper if that's what you have on hand.
1. Cut a piece of freezer paper the exact size your unfinished quilt blocks should be.
2. Draw two straight lines on the freezer paper's unshiny side--one along the vertical center and one along the horizontal center.
3. Draw two diagonal lines, each from one corner to the opposite corner.
4. Draw any other lines you feel will help you position the block on the freezer paper, including the outer 1/4" if you're not using gridded paper.
5. Place a block on the ironing board, right side down Position the freezer paper on top of the block, shiny (unmarked) side down.
6. Align the quilt block with the freezer paper image, matching up strategic parts of the block with the drawing. Use short appliqu� pins to stab through areas to keep the two from shifting apart; regular straight pins are fine, but you won't be able to press as easily without removing them.
7. When the block and the drawn image are aligned as well as possible, press the paper onto the block. Remove the pins.
8. Inspect the edges of the block. They probably won't all reach the edges of the freezer paper, but they should be well enough into the outer quarter-inch area to catch the seam as it it sewn.
9. Repeat for all blocks that need to be squared up.
10. To sew blocks together, align freezer paper edges and check to make sure the patches are matched under the paper. Secure with pins if you like. Sew a seam 1/4" inward from the edge of the paper.
11. Assemble into rows then join rows. Do not remove papers until all adjoining blocks are sewn together. Leave the papers around the outer perimeter of the quilt until borders are added.
07-29-2014, 06:11 PM
#427
Super Member
Join Date: Jan 2011
Location: Wyoming in the summer, Florida in the winter
Posts: 7,583
seasaw I have done that before but when you get a block that is 12" it doesn't work very well. I really don't like sewing a quilt together with 1/8" seams that is going to be used a lot. I know mine are not always perfect but I do try to make them the 12 1/2"....yep sometimes I'm off a tad but I really do try. If it's more than 1/8", I take it apart and do it again. Last boom I got a few that were 12" blocks and just made them into pillowcases, they just wouldn't fit with the others. When I get the blocks back, the first thing I do now is measure them and iron. Another thing I look at is the points and if they are not 1/4" for me to sew them, I choose which ones I can use if the points are cut off and how it will look. I entered 1 of last booms quilts in the fair as a community quilt and did a write up that it was part of this swap. That's why I'm a little picky I guess but they are suppose to be 12 1/2", as per the rules, and they should be very close. 1 quilt got a blue ribbon but the other a red. Note saying blocks were not sized correctly, which I knew that, was curious to what they would say.
 07-30-2014, 07:25 AM
#430
Super Member
Join Date: Feb 2010
Location: Virginia
Posts: 1,260
I agree Jaba that I also try my darnedest to make the blocks the correct size but sometimes it just doesn't happen. When that happens with the swap blocks I will ditch the block and start over or redo it if possible. But I thought this was a great idea for the random &/or the test blocks that I have made that didn't come out right. I'm sure all of us come across blocks that just don't quite fit and this way of doing them might come in handy.
I have never enter a quilt into a show so I have no idea how they judge them. Personally, it's the prettiest for me. LOL
I have never enter a quilt into a show so I have no idea how they judge them. Personally, it's the prettiest for me. LOL

Thread
Thread Starter
Forum
Replies
Last Post
Janice McC
Member Swaps and Round/Row Robins
2112
06-07-2017 12:46 PM
Janice McC
Member Swaps and Round/Row Robins
1208
04-17-2016 03:46 PM
Janice McC
Member Swaps and Round/Row Robins
264
02-20-2016 06:07 PM
