
Boom 20 - Quail 3 month group
 04-18-2018, 07:13 PM
#1651
Power Poster

Join Date: Oct 2010
Location: Mississippi
Posts: 26,229
Beautiful quilt, Libster! The side borders were perfect for “filling it out”.
MollyM, there is a way. You can sandwich the quilt and then peel back the top and carefully cut off 2/3 of the batting only, using a curvy line rather than a straight one. Be sure not to cut the backing! Then you can roll the excess 2/3 of the top and backing out of the way so you can quilt the first third with only that third of batting to deal with under your needle. Then you replace the batting and join it with an iron on fusible strip. Cut away the final 1/3 of batting, quilt the middle third, and then repeat for the final third. Sorry you asked? It’s more complicated than quilting block by block and then joining.
The next time Craftsy has a free weekend, watch Marti Michelle’s class on QAYG strategy for any quilt. She shows this technique and many others.
 04-18-2018, 07:21 PM
#1652
Super Member

Join Date: Sep 2014
Location: Rural Oklahoma
Posts: 5,374
And another way to keep the back in one piece would be to sew your front into columns or rows. Place the center row / column and basically stitch and flip your way towards the edge. You would need to be very careful to keep your back from becoming "lax" full or puckering
04-18-2018, 08:41 PM
#1653
Senior Member

Join Date: Jun 2017
Location: Cheyenne, WY
Posts: 503
Kass, thanks for the info on OBW and Stack and Wack! I think I get the difference, but not sure I care! 
Libster, awesome quilt - I can imagine good cuddles in front of the Christmas tree!
I'm finishing up a sampler quilt for a wedding present right now, will post pics when done. I have blocks from the spring churn dash swap that I plan on using this summer for my first ever QAYG. I'm excited/nervous at the same time to give it a go!
04-19-2018, 01:31 AM
#1654
Super Member
Thread Starter

Join Date: Mar 2013
Location: WNC
Posts: 9,210
Libster, the quilt is beautiful! Congratulations! (I do see my block.) I’ll add it to the gallery soon. Thanks for sharing the picture.

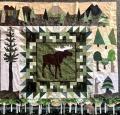
I took my Christmas Hummingbird quilt to church tonight for a picture. The wind was just not cooperating at all. I think everybody can see their blocks though. Sewbiz, I unashamedly used your border idea for mine too. I love it this way. This quilt will stay home with me. It's backed with a cream TOT flannel. So cuddly.
04-19-2018, 02:59 AM
#1656
Super Member

Join Date: Mar 2011
Location: NC
Posts: 3,773
Kass, thanks for the info on OBW and Stack and Wack! I think I get the difference, but not sure I care!
Libster, awesome quilt - I can imagine good cuddles in front of the Christmas tree!
I'm finishing up a sampler quilt for a wedding present right now, will post pics when done. I have blocks from the spring churn dash swap that I plan on using this summer for my first ever QAYG. I'm excited/nervous at the same time to give it a go!
Jayne, you are going to love doing your churn dashes this way. Since I did my first one this way, I haven't looked back once! Sewbiz' tute is so easy to follow. For those side borders, I cut 3 1/2" wide strips by length of quilt from border fabric, batting and backing fabric. I did not use sashing strips to join these to the sides of my quilt. When I flipped the border out, I top-stitched near the joining seam so that it laid nice and flat. Add binding and you are done! Such a good feeling!
04-19-2018, 03:46 AM
#1657
Super Member
Join Date: Sep 2014
Location: Rural Oklahoma
Posts: 5,374
This is beautiful!
I took my Christmas Hummingbird quilt to church tonight for a picture. The wind was just not cooperating at all. I think everybody can see their blocks though. Sewbiz, I unashamedly used your border idea for mine too. I love it this way. This quilt will stay home with me. It's backed with a cream TOT flannel. So cuddly.
04-19-2018, 06:10 AM
#1659
Super Member
Join Date: Jul 2013
Location: Michigan
Posts: 2,751
Great finish, Libster! :-)
mollymunchkin, I quilted a quilt similar to the way SBG and Kassaundra describe, however I had my top in three columns and also the back in three columns. I started in the middle, intending to do the middle column, then one side, then the other. I quilted the middle, like QAYG, stitching right off the edge of the fabric past the seam line. Then I laid the right column of the top, face down, right sides together, on the quilted middle column, and the back right column, face up, right sides together, on the bottom. I sewed them on, both at once. Then I zigzagged the right column batting on, butting the edge to the center column. Then I flipped the top and back out over the batting.
I had not measured the length that the back needed to be, and did not pin it. Kassaundra is right! It was very easy to make puckers on the back. In attaching the top flimsy to the quilted top, it was very difficult to match points and seams. I didn't understand why-- but it was murder doing it with a 80" x approx 24" strip. But the back was worse. Although I had only three little puckers or so, it was like I had eased in an extra 5 inches of fabric. I think that happened because I didn't want puckers at the stitched quilting lines on the center column. I ended up making darts in the back, in order to square it up and get it flat! Luckily the print was very forgiving, and those problems are not very noticeable. I repeated with the last side, using a measured back, and it went better, although I was stretching it the whole way to make it fit.
Still. I felt like the feat was a disaster.
The next quilt I did, I decided to quilt the center only out to within 3" of the vertical seams of the center column. I also decided to leave the batting in one piece to avoid it potentially becoming stiff at the joining. I wanted to quilt a simple grid, SITD, on the 3" patches of the top. I did the vertical lines of the center column. I couldn't decide what to do with the threads for the horizontal seams. It seemed like a lot of tails to sew in by hand if I started and stopped within 3" of both edges. It seemed like I was defeating my purpose of the method if I chose to quilt the horizontal seams after attaching the left and right columns. So! There it has sat at that point for the last 4 years.
Last edited by givio; 04-19-2018 at 06:20 AM.
04-19-2018, 08:15 AM
#1660
Super Member
Join Date: May 2012
Location: West Sacramento, CA
Posts: 3,018
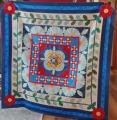
Mine will be delivered tomorrow. Sorry for the delay in posting. The new laptop does not have paint and I do not know how to resize the pictures without paint. Here they are:
[ATTACH=CONFIG]593195[/ATTACH]AnnieQuilts
[ATTACH=CONFIG]593196[/ATTACH]D.Henson
[ATTACH=CONFIG]593197[/ATTACH]Jaba
[ATTACH=CONFIG]593195[/ATTACH]AnnieQuilts
[ATTACH=CONFIG]593196[/ATTACH]D.Henson
[ATTACH=CONFIG]593197[/ATTACH]Jaba

Thread
Thread Starter
Forum
Replies
Last Post
Janice McC
Member Swaps and Round/Row Robins
1126
08-30-2017 07:24 PM
Janice McC
Member Swaps and Round/Row Robins
2112
06-07-2017 12:46 PM
Janice McC
Member Swaps and Round/Row Robins
923
03-21-2015 06:34 PM
