
Boom 22 - 2 month group - Sooner
 04-11-2019, 06:08 AM
#961
Super Member

Join Date: Aug 2016
Location: Kansas
Posts: 4,444
We hit 90* yesterday, and now back down to 58* today!
Sewbizgirl, how are you doing your QAYG with wider sashing? Do you use Kass's tutorial or kind of make up one of your own? I'm hoping to use QAYG this these boom blocks, but I want a 2.5" or 3" sashing on it. I really want to start using QAYG methods on all my quilts. Wrestling with the entire quilt is getting harder as my Baby Bump gets bigger and the weather gets warmer, as is finding space and time for the full basting operation. I'm hoping QAYG will help me with less UFOs!
Sewbizgirl, how are you doing your QAYG with wider sashing? Do you use Kass's tutorial or kind of make up one of your own? I'm hoping to use QAYG this these boom blocks, but I want a 2.5" or 3" sashing on it. I really want to start using QAYG methods on all my quilts. Wrestling with the entire quilt is getting harder as my Baby Bump gets bigger and the weather gets warmer, as is finding space and time for the full basting operation. I'm hoping QAYG will help me with less UFOs!
 04-11-2019, 06:11 AM
#962
Super Member
Thread Starter

Join Date: Mar 2013
Location: WNC
Posts: 9,153
My notes indicate I will be holding Darcyshannon's blocks for Later shipping as well. DS, please ignore my email. Thank you!
I've now also heard from Macybaby and NZQuilter with the ok to ship early. Yay!
I've now also heard from Macybaby and NZQuilter with the ok to ship early. Yay!
Morning, Sooners! I've gotten the ok to ship from Mona G, Libster, Zozee, Jaba and SBG. I'll be holding Hav4boys' until Later is ready.
I'd like to hear from everyone so I know you are aware the shipping date has moved up a week. Please post here or email me or pm me with your ok. I'll probably send the remaining people an email to expedite the situation.
NanaKathy55, please check your emails for a message from me.
edited to add: email just sent to those who I've not heard from. Please reply. Thanks!
04-11-2019, 06:17 AM
#963
Super Member

Join Date: Jul 2013
Location: South Dakota
Posts: 8,147
I've got a "snow day" today - pretty much the whole state is shut down due to the weather. Lost power for most of yesterday afternoon when we had freezing rain, but now it's cold enough to only be snow.
 04-11-2019, 08:09 AM
#966
Power Poster

Join Date: Oct 2010
Location: Mississippi
Posts: 26,171
Sewbizgirl, how are you doing your QAYG with wider sashing? Do you use Kass's tutorial or kind of make up one of your own? I'm hoping to use QAYG this these boom blocks, but I want a 2.5" or 3" sashing on it. I really want to start using QAYG methods on all my quilts. Wrestling with the entire quilt is getting harder as my Baby Bump gets bigger and the weather gets warmer, as is finding space and time for the full basting operation. I'm hoping QAYG will help me with less UFOs!
I join all the short sections first... making horizontal rows. Then I join the rows with a long sashing and batting strip. Lastly, I add the 3" borders all around the outside, with their batting and backing pieces. I do it Marti Michell style... no "speedbumps", as she says! In the end it doesn't look like a QAYG quilt, because of the wide sashings.
Take care of that "bump"... and you!
04-11-2019, 08:57 AM
#967
Super Member
Join Date: Aug 2016
Location: Kansas
Posts: 4,444
Thank you for the clear instructions, SBG! That doesn't sound too intimidating.  I think I can manage it! I've been watching Marti Michell's Craftsy class and really want to give it a try. My last few quilts I've done an overall meadering as my only quilting design. I like a quick quilting design, but I am hoping I can enjoy some "custom" quilting if I do QAYG. Less bulk will let me relax more and just focus on one block at a time. This boom quilt will be perfect for play quilting!
I think I can manage it! I've been watching Marti Michell's Craftsy class and really want to give it a try. My last few quilts I've done an overall meadering as my only quilting design. I like a quick quilting design, but I am hoping I can enjoy some "custom" quilting if I do QAYG. Less bulk will let me relax more and just focus on one block at a time. This boom quilt will be perfect for play quilting!
04-11-2019, 10:15 AM
#968
Power Poster
Join Date: Oct 2010
Location: Mississippi
Posts: 26,171
I am taking pictures as I put mine together today, and will post them in a bit. It's always easier for me to "see" things done rather than read instructions.
Marti Michell's classes on QAYG are great! I got to meet her in her booth at the Paducah show a couple of years ago. She's such a sweet lady.
Marti Michell's classes on QAYG are great! I got to meet her in her booth at the Paducah show a couple of years ago. She's such a sweet lady.
Last edited by sewbizgirl; 04-11-2019 at 10:19 AM.
04-11-2019, 11:13 AM
#969
Super Member
Thread Starter
Join Date: Mar 2013
Location: WNC
Posts: 9,153
Tracking info is being sent by USPS, you should have it within a short while, if you haven't gotten it already.
NanaKathy55, I still need to hear from you. I've not set up shipping yet for you so please check your emails/pms for a message. Thanks!
NanaKathy55, I still need to hear from you. I've not set up shipping yet for you so please check your emails/pms for a message. Thanks!
04-11-2019, 02:17 PM
#970
Power Poster
Join Date: Oct 2010
Location: Mississippi
Posts: 26,171
Yay, got my shipping notification! Thank you Janice.
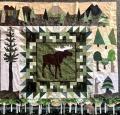
Just finished one of my lap quilts from last Boom... used half of my blocks and will make another with the other half. I took pics as I assembled it, so they may help with understanding the process, for anyone who is interested.
Mine is a 9 block quilt, 3x3. I used 3" sashings and borders. Top and bottom sashings were different. This photo shows the top and bottom sashings clipped to the right edge of a first block of a row of 3, right sides towards the block. The same will be done with the second block.
[ATTACH=CONFIG]611474[/ATTACH]
This shows the back side of this step.
[ATTACH=CONFIG]611475[/ATTACH]
Sew 1/4" seam and press sashing pieces away from the block. Trim top and bottom edges of sash even with the block. Then press under 1/4" on the long edge of the top sash. Repeat this step with the second block in this row.
[ATTACH=CONFIG]611476[/ATTACH]
Join the first block to the second... peel back the front sash and sew only the back sash to the right side of the second block, 1/4" seam.
[ATTACH=CONFIG]611477[/ATTACH]
Open out the second block and press the seam allowances towards the sashing between the blocks. With the two seams pressed in, this leaves a 2" gap that you will fill with a batting strip. Cut the batting 2" wide x length of your block.
[ATTACH=CONFIG]611478[/ATTACH]
Pat the batting strip in, between the seam allowances, so it is 'nested' with no overlap.
[ATTACH=CONFIG]611479[/ATTACH]
(Picture insisted on loading sideways), but close the top sash and pin the folded edge just over the stitching line on the block.
[ATTACH=CONFIG]611480[/ATTACH]
Then in the best matching thread you can find, topstitch close to the fold edge. Trim top and bottom of sash even with the blocks. Repeat this for the joining of the second block to the third block. Then join all of your horizontal rows in this same manner.
[ATTACH=CONFIG]611481[/ATTACH]
Here are my 3 horizontal rows all joined. Now the rows will be joined in exactly the same manner as the blocks, with only one additional thing to consider: be sure to mark the intersections on the sashing so that your vertical sashings line up. When they are 'off' it's very unsightly, so take an extra minute to get this right. Here are my two sashings, right sides towards the row, ready to be sewn. Sew a 1/4" seam and press open as you did for the vertical sashings.
[ATTACH=CONFIG]611482[/ATTACH]
(more in the next post, below.)
Last edited by sewbizgirl; 04-11-2019 at 02:28 PM.

Thread
Thread Starter
Forum
Replies
Last Post
Janice McC
Member Swaps and Round/Row Robins
1126
08-30-2017 07:24 PM
Janice McC
Member Swaps and Round/Row Robins
2112
06-07-2017 12:46 PM
Janice McC
Member Swaps and Round/Row Robins
923
03-21-2015 06:34 PM
Janice McC
Member Swaps and Round/Row Robins
361
12-07-2014 06:35 PM
