
Ideas for a really unique border?
 11-10-2019, 04:23 AM
#11
Super Member

Join Date: Oct 2019
Location: Corpus Christi, Texas
Posts: 1,942
Love your quilt!
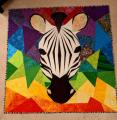
I, too, was looking for a new border idea. I am learning soo much from this site, Like how inexperienced I am. This is probably an ancient pattern, but it caught my eye. I wanna try it
[ATTACH=CONFIG]619548[/ATTACH]
I, too, was looking for a new border idea. I am learning soo much from this site, Like how inexperienced I am. This is probably an ancient pattern, but it caught my eye. I wanna try it
[ATTACH=CONFIG]619548[/ATTACH]
 11-10-2019, 04:59 AM
#12
Super Member
Join Date: May 2017
Location: Sunny Florida
Posts: 4,427
First, these fabrics look wonderful in your quilt. The design looks like an over shot of a forest, trees, ponds, and ice-cap mountains.
What size is the quilt? I love the two pointed ends and think they would work into a great finish. Do you keep those or cut them straight?
Of course, those dimple dots just get me every time. But that top gold fabric would be my choice.
Have fun with the decisions!
What size is the quilt? I love the two pointed ends and think they would work into a great finish. Do you keep those or cut them straight?
Of course, those dimple dots just get me every time. But that top gold fabric would be my choice.
Have fun with the decisions!
11-10-2019, 05:19 AM
#13
Super Member
Join Date: Jul 2010
Location: SW Florida
Posts: 1,194
I am drawn to the lighter tan shades, since they would provide more contrast. and I like the bear .... are you into applique? You could do a simple border in the tan, then in lower left corner, applique a bear that sits on both the border and the main part, so it appears to be looking into the "scene"
11-10-2019, 06:18 AM
#14
Super Member
Join Date: Aug 2009
Location: Illinois
Posts: 1,813
I appreciate having the border being from the "mother fabric" of a OBW so there is reference to what can be done with it.
The blocks themselves create a lot of movement. If you are determined to not use the simple yardage as border, how about using the solids that you showed as a piano key border after putting a narrow stopper border around the blocks?
The blocks themselves create a lot of movement. If you are determined to not use the simple yardage as border, how about using the solids that you showed as a piano key border after putting a narrow stopper border around the blocks?
11-10-2019, 06:36 AM
#15
Senior Member
Thread Starter
Join Date: Jun 2019
Location: Iowa
Posts: 377
Thank you for all the encouragement and great ideas everybody!!! I just measured it and its kind of a disappointing 35 1/2� x 52� (i did plan to square up the top and bottom just cuz i dont wanna go through binding the zigzag!).
So... i guess unless i figure out something drastic i havent considered yet, it will be just a wallhanging. I tend to shy away from adding borders �just to make it bigger� if the addition doesnt really add to the overall effect of the quilt. For some reason i always think of that on the order of �lets have a quilt show just so we can have vendors�! Yep, i have said that facetiously cuz a quilt show is so much work (we have a small guild) - i vote for a shop hop or getting together a bus load of guild members and attending another large guild�s show instead!
I�m glad RhondaK asked about the size of the quilt because i honestly hadnt dared to measure it until this morning! Hmmmm... kinda puny - you would have thought with all that work it would have amounted to something larger! But then, maybe if i just make a decision to tell myself it�s ok for it to be a wallhanging instead of the actual quilt i had planned then it will be a little easier for me to think a little more creatively! What would you do (besides bothering to measure it a long time ago!)???
It has been forever since i started this project. This morning when i went to measure the quilt i realized exactly how much leftover yardage of the �mother� fabric i had - so yes, my intent was actually to make it bigger (which means making a lot more blocks and i swore i wouldnt do that). And i could - but i probably wont - cuz i think i really am ready to �put some lipstick on this pig and move on�! Hey, i live in Iowa - and although i dont farm, its part of the vernacular!
So, in light of the now known fact of the size... would you handle the finish differently knowing it will probably live on a wall (in front of God and everybody) as opposed to living out its life in relative obscurity resting in peace on a bed in the guest bedroom?
11-10-2019, 06:49 AM
#16
Super Member
Join Date: Dec 2012
Posts: 1,857
I would not do a 'special' or 'fancy' border. I would do a basic either dark green or chocolate brown border to frame this great top. I think I might leave the triangle parts on the side and border around then and then have a straight border at top and bottom (still thinking about that). But, the goal would be to just let this work stand out, not compete with it. And perhaps use the aimal piece in the backing. I am really big on doing some sort of piecing to the backs of my quilts rather than plain backing fabric. This piece would look great as a large center panel with a couple wide borders around it - maybe a medium brown, medium green, then dark brown and dark green. Can't wait to see the pics of your choices.
11-10-2019, 07:27 AM
#17
Senior Member

Join Date: Apr 2011
Location: N. Atlanta, GA
Posts: 805
Zozee came up with the same idea I had. "All kidding aside, I'm thinking the sky blue border first (narrow) then wide golden border to brighten the whole thing up and draw the eye from inside to outside, and bind in forest."
It's a stunning design but it's dark and the first thing I noticed was how happy my eyes were to see the blue. so, not too much...a small flange almost and then onto the gold. and keep it simple. you don't need anything 'different' at this point. You need it done so you can free yourself for more creative projects. But remember, your time with this little quilt hasn't been wasted. Each time you've wrestled with it and puzzled over it, you've deepened your creativity and opened up a bit more as an artist. This was not time wasted!!
It's a stunning design but it's dark and the first thing I noticed was how happy my eyes were to see the blue. so, not too much...a small flange almost and then onto the gold. and keep it simple. you don't need anything 'different' at this point. You need it done so you can free yourself for more creative projects. But remember, your time with this little quilt hasn't been wasted. Each time you've wrestled with it and puzzled over it, you've deepened your creativity and opened up a bit more as an artist. This was not time wasted!!
11-10-2019, 07:35 AM
#18
Super Member
Join Date: Sep 2011
Posts: 2,646
lots of different border styles on this pininterest page: https://www.pinterest.com/quiltinspi...autologin=true
love your obw!
love your obw!
11-10-2019, 07:39 AM
#19
Senior Member
Join Date: May 2012
Posts: 653
I would not do a 'special' or 'fancy' border. I would do a basic either dark green or chocolate brown border to frame this great top. I think I might leave the triangle parts on the side and border around then and then have a straight border at top and bottom (still thinking about that). But, the goal would be to just let this work stand out, not compete with it. And perhaps use the aimal piece in the backing. I am really big on doing some sort of piecing to the backs of my quilts rather than plain backing fabric. This piece would look great as a large center panel with a couple wide borders around it - maybe a medium brown, medium green, then dark brown and dark green. Can't wait to see the pics of your choices.
11-10-2019, 08:34 AM
#20
Power Poster
Join Date: Apr 2011
Location: Ontario, Canada
Posts: 17,762
Thank you for all the encouragement and great ideas everybody!!! I just measured it and its kind of a disappointing 35 1/2” x 52” (i did plan to square up the top and bottom just cuz i dont wanna go through binding the zigzag!).
So... i guess unless i figure out something drastic i havent considered yet, it will be just a wallhanging. I tend to shy away from adding borders “just to make it bigger” if the addition doesnt really add to the overall effect of the quilt.............
So... i guess unless i figure out something drastic i havent considered yet, it will be just a wallhanging. I tend to shy away from adding borders “just to make it bigger” if the addition doesnt really add to the overall effect of the quilt.............
Sometimes borders work and make sense... and sometimes they can destroy what is a nice quilt.
While you are disappointed in the size ... do you have a wall that this could fit on?
About the zig-zag binding issue ... you could somewhat deal with that by adding "blackish" tris to the bottom, in the same manner as your kaleido hexies were done. Then chop off the excess for a straight edge to bind. I'd then go for a wide binding all round (1-1/2"-2"?) which would then give you a nice "frame" to show off this amazing piece.
To explain "blackish" ... dark brown, dark green or even black. Not seeing it IRL, it's hard to know what would be best, but the concept I am going for is "reads black", so that the colours of the quilt can float above, yet the dark only frames and somewhat disappears from the viewers vision and not compete with the OBW.
Good Luck!
Last edited by QuiltE; 11-10-2019 at 08:43 AM.

Thread
Thread Starter
Forum
Replies
Last Post
karensue
For Vintage & Antique Machine Enthusiasts
4
04-01-2012 02:42 AM
BuzzinBumble
Main
71
10-21-2011 12:36 PM
