
The Never Ending top is done!

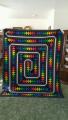


 I hope you'll put up pictures when you finish quilting it - really love this!
  12-11-2011, 01:01 PM
#48
Senior Member
Join Date: Nov 2011
Location: Illinois/Wisconsin
Posts: 878
I love this quilt. It is beautiful. I guess I am a bit "country".
"The applique was done using heat resistant Mylar cut out in the heart shapes to turn under the edges with starch..."
Would you please give me a bit more information regarding your statement above? I am so curious and would love to know how you did this.
"The applique was done using heat resistant Mylar cut out in the heart shapes to turn under the edges with starch..."
Would you please give me a bit more information regarding your statement above? I am so curious and would love to know how you did this.

 12-11-2011, 01:53 PM
#50
Super Member
Thread Starter
Join Date: Jan 2009
Location: California
Posts: 3,502
Thank you all for the lovely words! I'm thinking and working on how to quilt it. I want it fairly simple since there is a lot going on in the quilt, a little more in the borders.
Instructions:
To make appliques: 1. Cut template the exact size of finished applique shape. 2. Place template on wrong side of fabric and trace around with marking pencil. Cut out leaving 1/4 inch seam allowance. 3. Reposition template on wrong side of cut fabric shape. (I stick pins through the Mylar into the pressing surface so it doesn't move) Brush the 1/4" seam allowance with starch or sizing. Press seam allowance back over edge of template. 4. Remove template. Fabric shape is ready to be applied.
Here are the sheets. http://www.connectingthreads.com/too...-_TD81521.html
This is a video using pre-cut templates of Perfect Circles (I have both sets).
http://www.youtube.com/watch?v=R2OejEETDfM
It's great for machine or hand applique. I use Elmer's School Glue with a tiny metal bottle tip that comes in a set. Place them on the quilt and iron to set and dry the glue. They stay in place for sewing. For machine applique put the thin line of glue very close to the edge. For hand applique don't put it as close so that the edge isn't stiff with glue and hard to sew.
I got the metal glue tips at Joanns, it was in the craft area with the glues. It came in a set with 3 or 4 different sized tips and two small bottles but the tips fit on the Elmer's bottle.
Just remembered that I posted about applying the hearts here...
http://thecasualquilter.blogspot.com...ng-hearts.html
Last edited by pittsburgpam; 12-11-2011 at 01:58 PM.

Thread
Thread Starter
Forum
Replies
Last Post
