
second strip patch

 08-02-2010, 12:40 PM
#22
Senior Member

Join Date: May 2010
Location: Brentwood, CA
Posts: 317
Originally Posted by skavanau
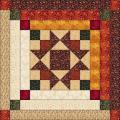
Here is the one I made tonight. I dont know if I want a whole quilt in this pattern or maybe make 6or 8 of these and make a quilt with added sashes around them, what do you think?
08-02-2010, 05:24 PM
#24
Senior Member
Thread Starter
Join Date: Jan 2010
Location: Independence VA
Posts: 555
I did post everything on this message. It just white broadcloth, I used an 11 1/2 inch square template. My strips are 1".
here is the post:
This is how I found this pattern:
http://happythings.typepad.com/happy...tion_piec.html
The only thing I did was make all my strips 1", and I picked the colors and deceided to make the cornors big, so they would stand out more. And when you pic 4 squares together , in the middle it makes a pattern.
Sorry forgot to answers this question. I used my 11 1/2" square template for the foundation piece. And as far as the size it will be , Im justing adding another square until I get it the size I want. So it will be a queen size with probably a sash around and the binding or maybe just the binding , Ill have to wait and see how all the squares turn out. You could do the squares in any size, what ever you prefer.Oh and one more thing. When I cut the foundation peice, I then took my ruler an placed it in the left hand corner and went straight to the opposte corner (with a pencil),and my first piece I placed on the line and just kept going. When I got to the end of one side I turned it around and did the other side, I laid all strips out before I sewed so I could adjust the colors if need be and thats how I got the lines so straight. Sorry this is so lengthy I NEVER had anyone ask me how to do a pattern. New to explaining.
 08-02-2010, 06:41 PM
#26
Senior Member
Join Date: May 2010
Location: Brentwood, CA
Posts: 317
Originally Posted by skavanau
I did post everything on this message. It just white broadcloth, I used an 11 1/2 inch square template. My strips are 1".
here is the post:
This is how I found this pattern:
http://happythings.typepad.com/happy...tion_piec.html
The only thing I did was make all my strips 1", and I picked the colors and deceided to make the cornors big, so they would stand out more. And when you pic 4 squares together , in the middle it makes a pattern.
Sorry forgot to answers this question. I used my 11 1/2" square template for the foundation piece. And as far as the size it will be , Im justing adding another square until I get it the size I want. So it will be a queen size with probably a sash around and the binding or maybe just the binding , Ill have to wait and see how all the squares turn out. You could do the squares in any size, what ever you prefer.Oh and one more thing. When I cut the foundation peice, I then took my ruler an placed it in the left hand corner and went straight to the opposte corner (with a pencil),and my first piece I placed on the line and just kept going. When I got to the end of one side I turned it around and did the other side, I laid all strips out before I sewed so I could adjust the colors if need be and thats how I got the lines so straight. Sorry this is so lengthy I NEVER had anyone ask me how to do a pattern. New to explaining.
here is the post:
This is how I found this pattern:
http://happythings.typepad.com/happy...tion_piec.html
The only thing I did was make all my strips 1", and I picked the colors and deceided to make the cornors big, so they would stand out more. And when you pic 4 squares together , in the middle it makes a pattern.
Sorry forgot to answers this question. I used my 11 1/2" square template for the foundation piece. And as far as the size it will be , Im justing adding another square until I get it the size I want. So it will be a queen size with probably a sash around and the binding or maybe just the binding , Ill have to wait and see how all the squares turn out. You could do the squares in any size, what ever you prefer.Oh and one more thing. When I cut the foundation peice, I then took my ruler an placed it in the left hand corner and went straight to the opposte corner (with a pencil),and my first piece I placed on the line and just kept going. When I got to the end of one side I turned it around and did the other side, I laid all strips out before I sewed so I could adjust the colors if need be and thats how I got the lines so straight. Sorry this is so lengthy I NEVER had anyone ask me how to do a pattern. New to explaining.

Thread
Thread Starter
Forum
Replies
Last Post
ArchaicArcane
For Vintage & Antique Machine Enthusiasts
14
07-25-2015 11:15 AM
cny_sewer39
Pictures
86
10-09-2011 05:41 AM
cny_sewer39
Pictures
19
07-06-2011 04:31 AM
