
Test for posting a picture

 03-05-2023, 02:55 AM
#2
Senior Member
Join Date: May 2022
Location: Northeast
Posts: 682
Maybe this will help: this is what I do... (Note: I have never resized my pictures - just put them in the way they are)
________________
How to Post Picture in quilting forum:
Click on the 'Go Advanced' box below the quick reply message area. (quick reply message area is at the bottom of the page when you are in a thread)
then click on the paperclip symbol beside the happy face in the header above the message box (you'll see it after you click on the 'go advanced' box)
then click on 'choose a file' (and go to the picture file on your computer and choose the picture you want to post)
do this multiple times if you have more than one picture to post
then go clear over to the right side of the box where you chose a file, by sliding the tab on the bottom so you can see the right side of that page
and then click on the box that says 'upload' near the top of the page
once it is done uploading, then submit your reply --- ------ Note: do not preview the post, just submit your reply.
Last edited by quiltsfor; 03-05-2023 at 03:13 AM.
 03-05-2023, 10:32 AM
#5
Senior Member
Join Date: Jun 2021
Location: British Columbia
Posts: 619
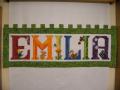
Beautiful quilt, Quiltsfor, but I'm even more intrigued by what it's hanging from. How does that work? I'm imagining kind of like a pants hanger, maybe, or it's hiding nails/hooks from which the quilt is hung?

 03-05-2023, 06:19 PM
#9
Senior Member
Join Date: May 2022
Location: Northeast
Posts: 682
It is two boards, each with a groove on the 'inside' of them close to the bottom of the boards for the binding part of the quilt to lay in.
On the back of the back board, there are recessed screws along the board to pull the boards together and hold the quilt tight. (recessed so that it lays flat against the wall)
Then there are three recessed hanging brackets on the back that are like keyholes where the board slides down over the large screws permanent in the wall (the screw heads sliding into the keyholes)
Then when I want to change the quilt (wall hanging) we just lift the board up and out of the screws, change the quilt and then slide it back onto the screws.
(Note: DH also used special screws to connect the two boards together, so that it can be undone and redone without damaging the wood - I have no idea what they are called.) Most hangers that we saw only had a box like groove in one of the boards, but DH liked the idea of routing rounded grooves in both boards opposite each other to more smoothly grasp the binding when the boards screwed together. All of the screws are above the grooves so that no quits will be damaged.
Last edited by quiltsfor; 03-05-2023 at 06:29 PM.
