
Card Tricks Block using stripes
 05-16-2010, 06:36 AM
#31
Super Member
Thread Starter
Join Date: Mar 2010
Location: New Hampshire
Posts: 4,555
Originally Posted by virtualbernie
Originally Posted by bstanbro
When you said there is no shortcut for this, I wasn't sure whether you were referring to the use of stripes or the block itself. Actually, there is a shortcut for the block by Eleanor Burns. The pattern is called Winning Hand. I've made two of them and they are much easier than the Card Trick method:
http://www.quiltingboard.com/t-29503-1.htm
http://www.quiltingboard.com/t-29504-1.htm
http://www.quiltingboard.com/t-29503-1.htm
http://www.quiltingboard.com/t-29504-1.htm
Sorry for not being more clear. If you want your card tricks blocks to appear as if each one has a mitered border by using stripes, then there isn't an easy way except to fussy cut.
 05-16-2010, 06:45 AM
#32
Super Member
Thread Starter
Join Date: Mar 2010
Location: New Hampshire
Posts: 4,555
More Tips for fabric selection:
I apologize for those who are ready to cut. I came across some tips while working on this that might prove helpful as you continue to select your fabrics.
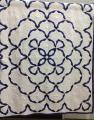
I ordered some fabric last week online and thought it might be good for my quilt. Once I received it, however, as pretty and high quality as it was, I knew right away that I wouldn't be able to use this particular fabric to make a striped card trick block. The reason was only because the design wasn't symmetrical. My loss is your gain. I decided to cut into it anyway as a sacrificial piece.
Flowers aren't symmetrical in nature, and they most usually are not symetrical in border prints. As it should be.
In the pictures, you will see the fabric before being cut, and then examples of two HST's that were cut from it.
I apologize for those who are ready to cut. I came across some tips while working on this that might prove helpful as you continue to select your fabrics.
I ordered some fabric last week online and thought it might be good for my quilt. Once I received it, however, as pretty and high quality as it was, I knew right away that I wouldn't be able to use this particular fabric to make a striped card trick block. The reason was only because the design wasn't symmetrical. My loss is your gain. I decided to cut into it anyway as a sacrificial piece.
Flowers aren't symmetrical in nature, and they most usually are not symetrical in border prints. As it should be.
In the pictures, you will see the fabric before being cut, and then examples of two HST's that were cut from it.
I like this, but it just won't work
[ATTACH=CONFIG]68378[/ATTACH]
closer view
[ATTACH=CONFIG]68379[/ATTACH]
2 pairs of nearly identical HST's
[ATTACH=CONFIG]68380[/ATTACH]
Keep the border along one edge, the flowers are not going to blend nicely into each other
[ATTACH=CONFIG]68381[/ATTACH]
The leaves are not going to blend either
[ATTACH=CONFIG]68382[/ATTACH]
 05-16-2010, 12:51 PM
#35
Member

Join Date: Apr 2010
Location: Algona, Iowa--"the heartland"
Posts: 69
Originally Posted by JenniePenny
More Tips for fabric selection:
I apologize for those who are ready to cut. I came across some tips while working on this that might prove helpful as you continue to select your fabrics.
I ordered some fabric last week online and thought it might be good for my quilt. Once I received it, however, as pretty and high quality as it was, I knew right away that I wouldn't be able to use this particular fabric to make a striped card trick block. The reason was only because the design wasn't symmetrical. My loss is your gain. I decided to cut into it anyway as a sacrificial piece.
Flowers aren't symmetrical in nature, and they most usually are not symetrical in border prints. As it should be.
In the pictures, you will see the fabric before being cut, and then examples of two HST's that were cut from it.
:-)
05-16-2010, 02:43 PM
#36
Super Member
Join Date: Dec 2007
Location: Daytona Beach Shores, FL
Posts: 2,352
I am so looking forward to see how you cut this. I have only a few stripped fabrics but want to make a few blocks to get me going. Be sure and say the size of each piece cut. Thank you for doing this.
05-16-2010, 03:55 PM
#37
Super Member
Thread Starter
Join Date: Mar 2010
Location: New Hampshire
Posts: 4,555
Cutting instructions:
I used blue template plastic to make two templates.
The first HST is from a 4 7/8 square of plastic, cut once on the diagonal. This is labeled as A.
the first QST is from a 5 1/4 square of plastic, cut twice on the diagonal. This is labeled as B.
I came up with a good system to cut my "A" units without the plastic template, because I was either slicing the edges off it, or it was slipping. So I used the corner of a ruler that had a line to mark the center of the corner (a 45 degree line) and used masking tape placed carefully at the 4 7/8 marks -see photo.
Let's start with the zigzag green.
Templates cut
[ATTACH=CONFIG]68724[/ATTACH]
ruler to serve as template A
[ATTACH=CONFIG]68725[/ATTACH]
two fabrics used for this block
[ATTACH=CONFIG]68726[/ATTACH]
05-16-2010, 04:05 PM
#38
Super Member
Thread Starter
Join Date: Mar 2010
Location: New Hampshire
Posts: 4,555
The stripes are easiest. Place your ruler or template along the bottom edge of a stripe. You can determine which stripe to use as your base line. Position your ruler or template so you only have to make two cuts.
You will need four identical units. In some cases, you can simply turn your fabric around, but check the pattern of the fabric carefully. Sometimes the stripes have colorways that make this not possible. That is actually the case of my red fabric which I will explain after we finish with the green fabric.
You will need four identical units. In some cases, you can simply turn your fabric around, but check the pattern of the fabric carefully. Sometimes the stripes have colorways that make this not possible. That is actually the case of my red fabric which I will explain after we finish with the green fabric.
Cut along template or ruler
[ATTACH=CONFIG]68885[/ATTACH]
for this stripe, I could simply turn the fabric around to cut the additional HST.
[ATTACH=CONFIG]68886[/ATTACH]
05-16-2010, 04:10 PM
#39
Super Member
Thread Starter
Join Date: Mar 2010
Location: New Hampshire
Posts: 4,555
Now, using one HST that you have cut, place it on the fabric, perpendicular to the stripe. Move it around on the fabric until it lines up and makes a corner.
Place template B here.
Place your ruler over the template - cut off excess fabric to the right.
Place template B here.
Place your ruler over the template - cut off excess fabric to the right.
Half Square Triangle placed on fabric to make a corner
[ATTACH=CONFIG]68888[/ATTACH]
template B
[ATTACH=CONFIG]68889[/ATTACH]

Thread
Thread Starter
Forum
Replies
Last Post
