
Card Tricks Block using stripes


 05-19-2010, 01:38 PM
#53
Super Member
Thread Starter
Join Date: Mar 2010
Location: New Hampshire
Posts: 4,555
Originally Posted by grocifer
I'm also waiting to hear where you have ordered your border prints. They are not easy to find in my area or at least not much choice!
Since I am in NH and buy locally, the particular shop names won't ring a bell. However, the fabrics are name brands: Kaufman, Jinny Beyer, Moda, etc.
It is true that the selection of border fabrics seems to be small in most LQS. It takes a while and several sources to have a little collection.
When I shop on line, my first stop is http://www.quiltshops.com. This is an electonic compilation of quilt stores.
I type in wide stripes, stripes, border prints, Andover, Jinny Beyer, and Peggy Toole for search terms. One that is very pretty and on my wish list is called Tuscan Wildflower.
Thank you for asking because I really would love to see someone else make a block like this. Post some pictures of any kind of stripe or border print. I'll be able to let you know if it would work in this block.
In a little while, I will post instructions for assembling the block.
05-19-2010, 04:14 PM
#56
Super Member
Thread Starter
Join Date: Mar 2010
Location: New Hampshire
Posts: 4,555
Assembling the block:
Sew two each of each color border HST to a HST in your background fabric. There are still a total of 4 unsewn HST (two in each color).
In the picture, I have removed a few of the cut pieces for the sake of clarity.
I have also sewn the four center triangles together, first in pairs, then as one unit.
Four corners sewn to background
[ATTACH=CONFIG]70268[/ATTACH]
05-19-2010, 04:27 PM
#57
Super Member
Thread Starter
Join Date: Mar 2010
Location: New Hampshire
Posts: 4,555
Sew your border print quarter-square triangles to the background quarter-square triangles. There will be four pairs of these. They comprise the center of each side of the block. Then sew each joined pair to the opposite color of the four remaining half-square triangles.
Throughout all of this, you have not needed to match up any stripes.
That comes next!
Throughout all of this, you have not needed to match up any stripes.
That comes next!
green sewn to white
[ATTACH=CONFIG]70271[/ATTACH]
all quarter square triangles lined up to be sewn to half square triangles
[ATTACH=CONFIG]70272[/ATTACH]
05-20-2010, 04:37 PM
#58
Senior Member

Join Date: Mar 2010
Location: Anchorage, Alaska
Posts: 416
Here it is May 20th and I am just now seeing all the posts concerning the card tricks block and have to say that Jennie Penny you have done a fantastic job with your tutorial. I love your quilt. Now I have to make this asap.
Just want to say thank you a million times. All you folks on here are the greatest.
Just want to say thank you a million times. All you folks on here are the greatest.
05-21-2010, 04:14 PM
#60
Super Member
Thread Starter
Join Date: Mar 2010
Location: New Hampshire
Posts: 4,555
OK let me see if I can finish this neatly for you.
At this point, I have 9 units (4 corner units, 4 edge units, and one block center).
Trim off all dog ears and square up each unit to 4 1/2".
Place your pieces down on your mat in three columns - left, center, and right.
Sew a corner unit to an edge unit. You will have to carefully line up the stripes or the fabric design. Since I cannot think of a better way to write this, I am quoting the designer Ann Lainhart, whose copyrighted pattern "Cards Anyone?" appears in Quilters World August 2007: "Stick a pin down through the upper square at a particular point and into the bottom square at the same point to make sure the design matches along the seam line." Use a few pins. Carefully machine stitch the square units together in sections of three. Let the presser foot of your machine slide over a pin before removing it.
I don't have pictures of the actual sewing - could not get a helper to take pictures while I sewed.
Contine sewing the units together with the same care and attention to detail.
The left and right sections will consist of two corner units plus an edge unit each. Press toward corners.
The center section will consist of two edge units and the center block. Press towards center.
Once you have sewn the 9 units into three sections, then (like a nine-patch) you sew the three sections together. Use pins to match seams. Take pins out as your pressure foot glides over them.
left section of block (two corner units plus an edge unit)
[ATTACH=CONFIG]71159[/ATTACH]
top center section
[ATTACH=CONFIG]71160[/ATTACH]
right section
[ATTACH=CONFIG]71161[/ATTACH]
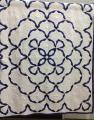
Finished block
[ATTACH=CONFIG]71162[/ATTACH]

Thread
Thread Starter
Forum
Replies
Last Post
