
Doing E to E on a Mid Arm
 06-24-2020, 03:12 PM
#1
Super Member
Thread Starter

Join Date: Dec 2015
Location: Ontario, Canada
Posts: 4,378
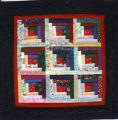
I want to do an edge to edge over all quilting design on my next quilt, but it is way out of my comfort zone.
The pattern I am using is below and I would normally do quilting in each block that set off the design and filled in the open areas, but this time, I want an over all pattern like you see long arm quilters do and I'm not sure how to begin. (I know long arm quilters usually are computerized, but I've seen some people do this on their mid arm, free hand)
Does anyone have any tips about designs to use or even where on the quilt to begin? (Upper corner and go across or do it in quadrants from the centre or?)
I should have all the rows put together and the borders on tomorrow. This is all so far.
Watson

 06-24-2020, 04:11 PM
#3
Super Member
Join Date: May 2012
Location: S.E. Queensland, Australia
Posts: 1,503
For a first try, I would probably do a simple meander, perhaps with loops, so the rows blends into each other with high & low points. I don't know the size of your blocks, guessing 6 or 8", but you could include one block and sashings above & below in each pass.
 06-24-2020, 04:51 PM
#6
Super Member

Join Date: Nov 2011
Location: South West Ontario
Posts: 2,237
If you want something more structured than a simple meander of loops and whirls - the one I like is more angular - you go up, across a ways, down partway, across again (making a sort of square on a line) etc. slowly working your way across the quilt. You leave some areas you don't go as far down, or "gaps" that you can then fill on the next row, like nesting.
Or go to Urban Elementz website and browse their patterns - there are many that you can re-create yourself, and they also have peel and stick ones that you can put on your quilt, stitch and then tear off. (Or you can make your own using a thin paper like Golden Threads) - lots of inspiration out there!
Enjoy!
06-24-2020, 05:52 PM
#7
Power Poster

Join Date: Mar 2009
Location: Lake Elsinore, CA
Posts: 15,265
I don't think "most" longarmers are computerized, though it is becoming more and more common. I do only hand guided work on my longarm, not using pantographs or computerization. Most instructors stress the importance of doodling your design on paper before starting on the quilt. That helps to get the design fixed in your mind, and you get to practice covering the whole page evenly. Mixing a few different designs (e.g. swirls and pebbles) gives the quilt more interest, and also helps fill in holes. The other trick is to do a lot of echoing.
06-24-2020, 06:48 PM
#8
Super Member

Join Date: Mar 2016
Posts: 1,348
I like this designer: www.meadowlyon.com. This design would look lovely with those pinwheels. Or this. You don't need a Iongarm to do pantos. Trace the pattern onto a roll of tracing paper or a water-soluble stabilizer, pin to the quilt, and baste it in place. I do e2e like that on my mid arm all the time. (Husband helped with only a couple of small quilts, tearing off tracing paper, before I told him about the water-soluble stuff. "Buy it!" he said.  ) Pinbasting first in rows, then with water-soluble thread so I can pull the pins and quilt without worrying about them. For me, starting at one center edge and going all the way across seems to work out best, then working from that center row/column out to the ends. Bind it and toss it in the washing machine.
The disadvantage of water-soluble products is that they're very responsive to humidity or lack thereof. Too humid and they stretch and stick to your skin when you sweat. Too dry and they get brittle. Wet-nosed dogs are hazardous as well. My granddog was staying with us, wandered into my studio, and stuck her nose onto my quilt! Fortunately I'd already done that corner.
) Pinbasting first in rows, then with water-soluble thread so I can pull the pins and quilt without worrying about them. For me, starting at one center edge and going all the way across seems to work out best, then working from that center row/column out to the ends. Bind it and toss it in the washing machine.The disadvantage of water-soluble products is that they're very responsive to humidity or lack thereof. Too humid and they stretch and stick to your skin when you sweat. Too dry and they get brittle. Wet-nosed dogs are hazardous as well. My granddog was staying with us, wandered into my studio, and stuck her nose onto my quilt! Fortunately I'd already done that corner.
Last edited by IceLeopard; 06-24-2020 at 06:50 PM.
06-24-2020, 07:13 PM
#9
Super Member
Join Date: Sep 2019
Location: North Idaho
Posts: 1,704
I found thatthe easiest free motion pattern to start with was a loopy meander. It is so very forgiving. A lot of people suggest a regular meander/stipple, but it took me a while before I was ready to try that one.
https://www.youtube.com/watch?v=dBXwwUUM428
https://www.youtube.com/watch?v=dBXwwUUM428
