
Easy Star Pattern

 10-30-2011, 08:50 AM
#2
Super Member
Join Date: May 2011
Location: Pacific NW
Posts: 9,585
Anything wonky, lol!
Okay, that wasn't very helpful, was it. I was thinking if it was purposefully wonky, then a beginner wouldn't have to worry about matching points, etc.
Here's a tutorial if it looks like something you'd be interested in.
http://thesillyboodilly.blogspot.com...-tutorial.html

Okay, that wasn't very helpful, was it. I was thinking if it was purposefully wonky, then a beginner wouldn't have to worry about matching points, etc.
Here's a tutorial if it looks like something you'd be interested in.
http://thesillyboodilly.blogspot.com...-tutorial.html
10-30-2011, 08:55 AM
#3
Super Member

Join Date: Feb 2011
Location: Where the deer & antilope play and the eagles soar
Posts: 1,540
The friendship star is an easy one.
http://quilterscache.com/F/FriendshipStarBlock.html
check out quilterscache.com and there are so many different blocks on there. They will be marked with a pin..one pin is the easiest. good luck..happy stitchin' crafty_linda_b
http://quilterscache.com/F/FriendshipStarBlock.html
check out quilterscache.com and there are so many different blocks on there. They will be marked with a pin..one pin is the easiest. good luck..happy stitchin' crafty_linda_b
10-30-2011, 09:02 AM
#4
Super Member

Join Date: Feb 2009
Location: South central Nebraska, US
Posts: 5,367
If you want a star with even points (not quite so wonky as the one above, but that one is still cute as can be) here is a moda bakeshop one that does not need points matched.
http://www.modabakeshop.com/2010/10/...uilt.html#more
http://www.modabakeshop.com/2010/10/...uilt.html#more
10-30-2011, 09:08 AM
#5
Power Poster

Join Date: Mar 2011
Location: western NY formerly MN, FL, NC, SC
Posts: 51,430
Originally Posted by crafty_linda_b
The friendship star is an easy one.
http://quilterscache.com/F/FriendshipStarBlock.html
check out quilterscache.com and there are so many different blocks on there. They will be marked with a pin..one pin is the easiest. good luck..happy stitchin' crafty_linda_b
http://quilterscache.com/F/FriendshipStarBlock.html
check out quilterscache.com and there are so many different blocks on there. They will be marked with a pin..one pin is the easiest. good luck..happy stitchin' crafty_linda_b
10-30-2011, 11:23 AM
#7
Super Member
Join Date: Aug 2010
Location: Piedmont Virginia in the Foothills of the Blue Ridge Mtns.
Posts: 8,562
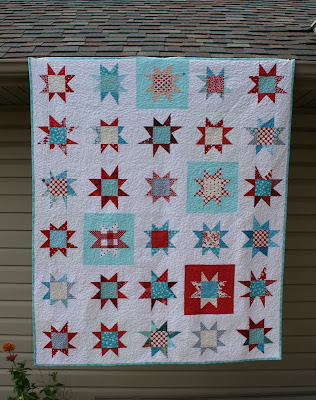
Here is an easy, efficient way to make an 8 pointed star block with no triangles and no loss of points.
For your 12" finished block:
Cut 8 squares of your background (base) fabric at 4 and 1/2" square. 4 will be for the star-points; 4 will be in the block corners.
Cut 1 square at 4 and 1/2" sq. for the center of the star.
Cut 8 squares of your star-point fabric (snowball) at 2 and 7/8".
If you wish, draw a line across one diagonal, corner to corner, on the wrong side of the snowball sqs.
Layer a snowball sq. on one corner of the base sq., right sides together.
Sew across the diagonal (on the line).
Press toward the corner.
Trim out ONLY the middle layer of fabric (unless you plan to handquilt this quilt). [The base sq. is perfectly square; trimming anything from it will cause it to be out of square and harder to match up to the next section of the block.]
Sew the adjacent corner as before. Press, trim, set aside.
Do 4 base squares this way, for your 4 star-point sections.
Follow the graphic of the complete star to assemble your block.
**TIP Notice that you do not lose your star-points with this method! Nor do you risk losing the dip between the star-points into the seam allowance because of the size you cut the snowball squares. This little bit of 'extra' makes the whole thing "starrier", in my opinion.:-D
Jan in VA
The little bits of white around the center of the star were left to show you how the dip does not drop below the seam line. Imagine them as red, for instance.
[ATTACH=CONFIG]279463[/ATTACH]


Thread
Thread Starter
Forum
Replies
Last Post
carolaug
Links and Resources
7
12-29-2012 05:23 AM
leatheflea
Pictures
194
10-08-2011 10:38 AM
