
Unbelievable find - next steps
 06-16-2018, 08:03 PM
#1
Super Member
Thread Starter
Join Date: Apr 2018
Location: Philomath, Oregon
Posts: 2,076
Soooooooo....
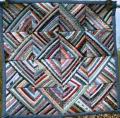
‘’for better or worse I bought my unbelievable find for 30 bucks. Now I need help figuring out how to repair and finish it. It has two rips, this one being the worst:
[ATTACH=CONFIG]596060[/ATTACH]
‘I was thinking I need to patch then mend or mend then patch. I’m not going to replace the hexes unless I really need to. The second R.I.P. is dead center in this king size beast.
second issue is how the heck to get borders on this thing. There are two problems, first, some of the blocks are really frayed (I just fray checked all the white edges). How do I deal with that? Second, the top and bottom don’t have a straight edge, they have the hexi shape
[ATTACH=CONFIG]596061[/ATTACH]
[ATTACH=CONFIG]596062[/ATTACH]
Any and all all help is greatly appreciated!
ps. The little cuddle bug is Cash, he always likes to be in on whatever I’m doing.
 06-16-2018, 09:30 PM
#2
Super Member
Join Date: May 2012
Location: S.E. Queensland, Australia
Posts: 1,503
Be daring and replace the damaged pieces - I think the only way to repair them is to either use the same shade of fabric underneath with a double-sided fusible or applique a star or something on the top.
For the borders I just used a 5" wide strip of fabric, folded the edges of the hexies under, and appliqued over the border - used soluble glue instead of pinning.
[ATTACH=CONFIG]596063[/ATTACH]
For the borders I just used a 5" wide strip of fabric, folded the edges of the hexies under, and appliqued over the border - used soluble glue instead of pinning.
[ATTACH=CONFIG]596063[/ATTACH]

 06-17-2018, 04:26 AM
#7
Super Member
Join Date: May 2017
Location: Sunny Florida
Posts: 4,434
Remove the torn pieces and replace them. It is just tedious but can be done. You can mark the seam allowances on the replacement fabric so you have the stopping points. Starch the pieces and/or use freezer paper. It's one seam at a time. You can do this!
Trim off the hex edges and remove any frayed edges even if you lose a little of the design. Stay stitch around the whole quilt. Press again and then add straight borders.
It's a beautiful quilt and certainly deserves your time and attention to compete it.
Your side kick is a cutie!
Trim off the hex edges and remove any frayed edges even if you lose a little of the design. Stay stitch around the whole quilt. Press again and then add straight borders.
It's a beautiful quilt and certainly deserves your time and attention to compete it.
Your side kick is a cutie!
 06-17-2018, 06:30 AM
#10
Super Member
Join Date: Dec 2010
Location: Norfolk, VA
Posts: 5,397
I personally would match the fabric since it looks like that would be doable and replace them. If you really don't want to do that, patch them but put a saying on it. You know how the Amish have those sayings about no quilt is perfect. Even one that represents a patch saying ouch. Something. Let us know what you do

Thread
Thread Starter
Forum
Replies
Last Post
Iluv2quilt
General Chit-Chat (non-quilting talk)
40
11-06-2009 05:01 AM
