
I'm New here and wanted to say Hello to the group.
 06-17-2023, 03:21 PM
#1
Member
Thread Starter

Join Date: Jun 2023
Posts: 20
Also, other than being new. Does anyone know much about a Singer 403A? I recently purchased one from eBay and didnt get a lot of information on it. It didnt come with the power or pedal cords. Fortunately I already had them from another machine that I kept. The machine is in really good shape. Just runs really slow. The wife says she smelled burning rubber. I immediately thought the belt was too tight. Of course the 403A has no belt its all gear driven. The pad under it was soaked with old oil and oily black when you touch it. Dunno if that has anything to do with it or not. Dont hardly think so. So I went thru and oiled and greased what I thot needed it and it may have helped a little bit but its really hard to tell. Any help I can get will be greatly appreciated.
 06-17-2023, 04:52 PM
#2
Super Member

Join Date: Mar 2015
Location: Denver, CO
Posts: 4,300
Welcome. I'm not sure what to clean the oil drip pan with, but I think that may help it smell better.
Do you have a manual? If not one can be found at https://res.cloudinary.com/singer-se...ng_Machine.pdf
There is a page about restoring a 403 at https://pungolivinghome.com/2022/01/...ewing-machine/
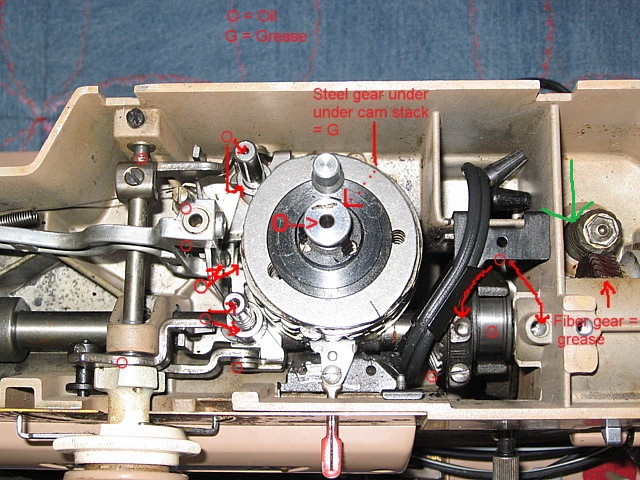
There is a thread about a 401 at She's real fun, my 401... which is quite similar. You may want to put a drop or two of 30W motor oil at the place indicated in this post - She's real fun, my 401...
There is also a thread about a 403 motor that may have something useful at https://www.quiltingboard.com/vbulle...h-t312624.html
We like pictures. In order to post pictures on Quilting Board, you will probably need to reduce or compress the picture to a file size that is smaller than 2MB. How to post images can be found at https://www.quiltingboard.com/attach...020-01-17-.pdf
Don't forget to scroll over to the far right to find and click on the "Upload" button. As shown at Standard Sewing Machine Co. Paragon
I have found that only the big red "Reply" button or "Quote" work to give me the paper clip icon to work for adding pictures.
https://www.quiltingboard.com/attach...p-location.jpg
Some additional info regarding reducing images at post #4 and images for the scroll and upload button can be found at #5 of quilt block ID?
Another way to post pictures can be found at 2021/2022, 2.5� Birthday Swap
And how to use an ipad to post pictures can be found at Uploading photos
Or simply - Make sure pictures are smaller than 2MB
Click on red "Reply" button
Click on the paper clip icon
Click browse - choose picture/s. (only 5 allowed per post)
Once they show up as being loaded, Scroll over to the right side and click on "Upload"
After the pictures show up as being attached, you can close that window and go back to the screen to finish posting your post.
Some additional notes -
The photos generally need to be reduced to less than 2MB in size. I have heard of people sending an email to themselves as it will ask if you want to reduce the size. I have an android phone and when I tried to reply on Quilting Board while in mobile view None of the options for adding pictures was available. However, there is an option down at the bottom left of the page that is for "Full Site" when I tapped on "Full Site" It then looked like the way it looks on my lap top. So it would have the Red Reply and the Go Advanced options.
Do Not Preview post.
Janey - Neat people never make the exciting discoveries I do.
Not affiliated with off-site link(s)
Do you have a manual? If not one can be found at https://res.cloudinary.com/singer-se...ng_Machine.pdf
There is a page about restoring a 403 at https://pungolivinghome.com/2022/01/...ewing-machine/
There is a thread about a 401 at She's real fun, my 401... which is quite similar. You may want to put a drop or two of 30W motor oil at the place indicated in this post - She's real fun, my 401...
There is also a thread about a 403 motor that may have something useful at https://www.quiltingboard.com/vbulle...h-t312624.html
We like pictures. In order to post pictures on Quilting Board, you will probably need to reduce or compress the picture to a file size that is smaller than 2MB. How to post images can be found at https://www.quiltingboard.com/attach...020-01-17-.pdf
Don't forget to scroll over to the far right to find and click on the "Upload" button. As shown at Standard Sewing Machine Co. Paragon
I have found that only the big red "Reply" button or "Quote" work to give me the paper clip icon to work for adding pictures.
https://www.quiltingboard.com/attach...p-location.jpg
Some additional info regarding reducing images at post #4 and images for the scroll and upload button can be found at #5 of quilt block ID?
Another way to post pictures can be found at 2021/2022, 2.5� Birthday Swap
And how to use an ipad to post pictures can be found at Uploading photos
Or simply - Make sure pictures are smaller than 2MB
Click on red "Reply" button
Click on the paper clip icon
Click browse - choose picture/s. (only 5 allowed per post)
Once they show up as being loaded, Scroll over to the right side and click on "Upload"
After the pictures show up as being attached, you can close that window and go back to the screen to finish posting your post.
Some additional notes -
The photos generally need to be reduced to less than 2MB in size. I have heard of people sending an email to themselves as it will ask if you want to reduce the size. I have an android phone and when I tried to reply on Quilting Board while in mobile view None of the options for adding pictures was available. However, there is an option down at the bottom left of the page that is for "Full Site" when I tapped on "Full Site" It then looked like the way it looks on my lap top. So it would have the Red Reply and the Go Advanced options.
Do Not Preview post.
We like pictures. In order to post pictures on Quilting Board, you will probably need to reduce or compress the picture to a file size that is smaller than 2MB. How to post images can be found at https://www.quiltingboard.com/attach...020-01-17-.pdf
Don't forget to scroll over to the far right to find and click on the "Upload" button. As shown at Standard Sewing Machine Co. Paragon
I have found that only the big red "Reply" button or "Quote" work to give me the paper clip icon to work for adding pictures.
https://www.quiltingboard.com/attach...p-location.jpg
Some additional info regarding reducing images at post #4 and images for the scroll and upload button can be found at #5 of quilt block ID?
Another way to post pictures can be found at 2021/2022, 2.5� Birthday Swap
And how to use an ipad to post pictures can be found at Uploading photos
Or simply - Make sure pictures are smaller than 2MB
Click on red "Reply" button
Click on the paper clip icon
Click browse - choose picture/s. (only 5 allowed per post)
Once they show up as being loaded, Scroll over to the right side and click on "Upload"
After the pictures show up as being attached, you can close that window and go back to the screen to finish posting your post.
Some additional notes -
The photos generally need to be reduced to less than 2MB in size. I have heard of people sending an email to themselves as it will ask if you want to reduce the size. I have an android phone and when I tried to reply on Quilting Board while in mobile view None of the options for adding pictures was available. However, there is an option down at the bottom left of the page that is for "Full Site" when I tapped on "Full Site" It then looked like the way it looks on my lap top. So it would have the Red Reply and the Go Advanced options.
Do Not Preview post.
Janey - Neat people never make the exciting discoveries I do.
Not affiliated with off-site link(s)
06-18-2023, 06:42 AM
#3
Member
Thread Starter
Join Date: Jun 2023
Posts: 20
Our Workbench,
Thats a lotta info all at once, and I do thank you very much.
Yes. I do have a manual and even and service manual to go with it. I found and printed as much as I cud find online. This is one of my favorite machines and I'd really like to get it back up and runnin like its posed to be.
I have checked and saved the links you gave me, all appreciated. Still learnin bout the picture things. I dont know what picture I cud take that'll show that the machine runs slow. Thats the only defect that I can find with the entire machine cept for it needin a good cleanin. I did find a load of fuzz. The type ya get after usin a machine a while with nuthin but cotton thread. I did blow it all out and I think I got it all. Well all I cud see anyway. I just checked it again this mornin and its still runnin slow after sittin over night from the oil and grease I did yesterday. I have a old white towel under it so I could see if I may overdo it with the lube. So far nuthin on the towel. I'm beginnin to think that the motor itself may be on its last leg. Hopefully not tho. More investigation to follow. Thank You again
06-18-2023, 06:52 AM
#4
Super Member
Join Date: Mar 2015
Location: Denver, CO
Posts: 4,300
My apologies for posting about how to post pictures twice. I didn't realize it until just now. Here on QB you only have twenty minutes to edit a post.
I'm wondering if the drop of 30W motor oil would help on the sluggishness.
Janey - Neat people never make the exciting discoveries I do.
Not affiliated with off-site link(s)
I'm wondering if the drop of 30W motor oil would help on the sluggishness.
Janey - Neat people never make the exciting discoveries I do.
Not affiliated with off-site link(s)
06-18-2023, 07:18 AM
#6
Member
Thread Starter
Join Date: Jun 2023
Posts: 20
I appreciate the info. I figure I wud put the oil in the same places as the manual tells me where to oil it. Unless you know somethin different that'll work better. Aint 30 weight oil a bit thick for a sewin machine? I was thinkin maybe air tool oil. If I dont use the sewin machine oil. I do have both and then some. Thanks again
06-18-2023, 07:44 AM
#7
Super Member
Join Date: Mar 2015
Location: Denver, CO
Posts: 4,300
I appreciate the info. I figure I wud put the oil in the same places as the manual tells me where to oil it. Unless you know somethin different that'll work better. Aint 30 weight oil a bit thick for a sewin machine? I was thinkin maybe air tool oil. If I dont use the sewin machine oil. I do have both and then some. Thanks again
I was trying to do some research this morning about the viscosity of various oils. For our vintage machines the recommended oil is sewing machine oil with a viscosity of 9.6 cSt @ 40�C; 2.61 cSt @ 100�C. I also looked at the sds or msds of some of them. Some have suggested mineral oil, but that one has a higher viscosity of 34.5-70 cSt @ 40 �C. I didn't read all but I think some of the Sailrite machines might use some heavier oil.
Janey - Neat people never make the exciting discoveries I do.
Not affiliated with off-site link(s)
06-18-2023, 01:27 PM
#9
Member
Thread Starter
Join Date: Jun 2023
Posts: 20
Thanks again Janey, I appreciate it. I did put some grease one the gear teeth where the 2 gears mesh. But I'll try the 30 weight. I mean it cant hurt it any at all. Thanks for the info. I havent had much of a chance to follow up on any of the links you sent, but I did save ever one of them.
Thank You ibex94, If I posted pictures of all my projects I'd probly get kicked off for postin too many. But I will post a couple as I go along. I have a Treadle Singer 27 that I completely went thru along with the cabinet finished and a White 31X that I did the same thing with. So far the only 2 that I got finished. Got plenty more to do.
I see your right down the road from us. Were headin down your way in Sept for almost a week. Its the BOSS's B-day. We like comin down that way. Thanks again. Dan
06-18-2023, 02:02 PM
#10
Super Member
Join Date: Mar 2015
Location: Denver, CO
Posts: 4,300
In this post She's real fun, my 401... Cari explains it a little better than just the picture. It is the bearing beneath the gears.
Janey - Neat people never make the exciting discoveries I do.
Not affiliated with off-site link(s)
Janey - Neat people never make the exciting discoveries I do.
Not affiliated with off-site link(s)
