
New Century Sewing Machines?
 04-25-2021, 01:24 PM
#21
Senior Member
Join Date: Apr 2020
Location: South of St Louis
Posts: 837
Unfortunately I live in Ohio but I appreciate that! And I'll keep looking! The one that I have was mounted on the side and had a bracket with screws but I removed it. I was just wondering if a modern motor with the presser foot would work on it? It says it works with almost all older machines that have side motors.
 04-26-2021, 01:17 PM
#22
Member
Thread Starter
Join Date: Apr 2021
Posts: 86
I removed it because it smelled like it was burning and I don't believe it's the original motor anyway? It was seller refurbished and the only thing "new" on it was the motor. The knee switch, the block which looked horrible and the light were only the original items. When I got the machine it had a rubber drive wheel motor on it, but I don't know if that's the original motor or not, either way it just smelled like burning and the machine seized up as in the hand wheel would not spin. I plugged it in it went crazy going up and down so I used the knee switch to try and stop it and that's when it seized up and just smelled of horrible burning. But it it was a direct drive motor like the other person replying to me said then I think they changed motors. I don't know if they drilled into the side of it to attach the side motor or not. I really know nothing about any of it. I kind of feel like I got myself into a mess. Presently it now has a tractor spinner knob on it.
04-26-2021, 01:35 PM
#23
Senior Member
Join Date: Apr 2020
Location: South of St Louis
Posts: 837
Don't give up on it! The motor may have been burning, so it's good you removed it. A lot of treadle or hand crank machines from various companies were retrofitted with motors, or motor mounts designed to use existing hand crank mounts (e.g. Singer). The motor may or may not have the same manufacturing name as the machine. The 2 machines I have on the workbench similar to yours both have Westinghouse motors, and I'd not hesitate to guess that these were put on at a dealer's before being sold, or retrofitted in a factory somewhere, or they may have even come out of the factor that way.
I have a very similar machine, although it does not have a spoked hand wheel to accept a tractor spinner knob. I will get some pictures posted here in the next day or two to explain about the motor mounting.
I have a very similar machine, although it does not have a spoked hand wheel to accept a tractor spinner knob. I will get some pictures posted here in the next day or two to explain about the motor mounting.
04-26-2021, 04:18 PM
#24
Super Member

Join Date: Mar 2015
Location: Denver, CO
Posts: 4,357
I'm guessing that you may have plugged the motor into the "light" outlet of the motor block. Most are not marked as well as this one of Leon's -
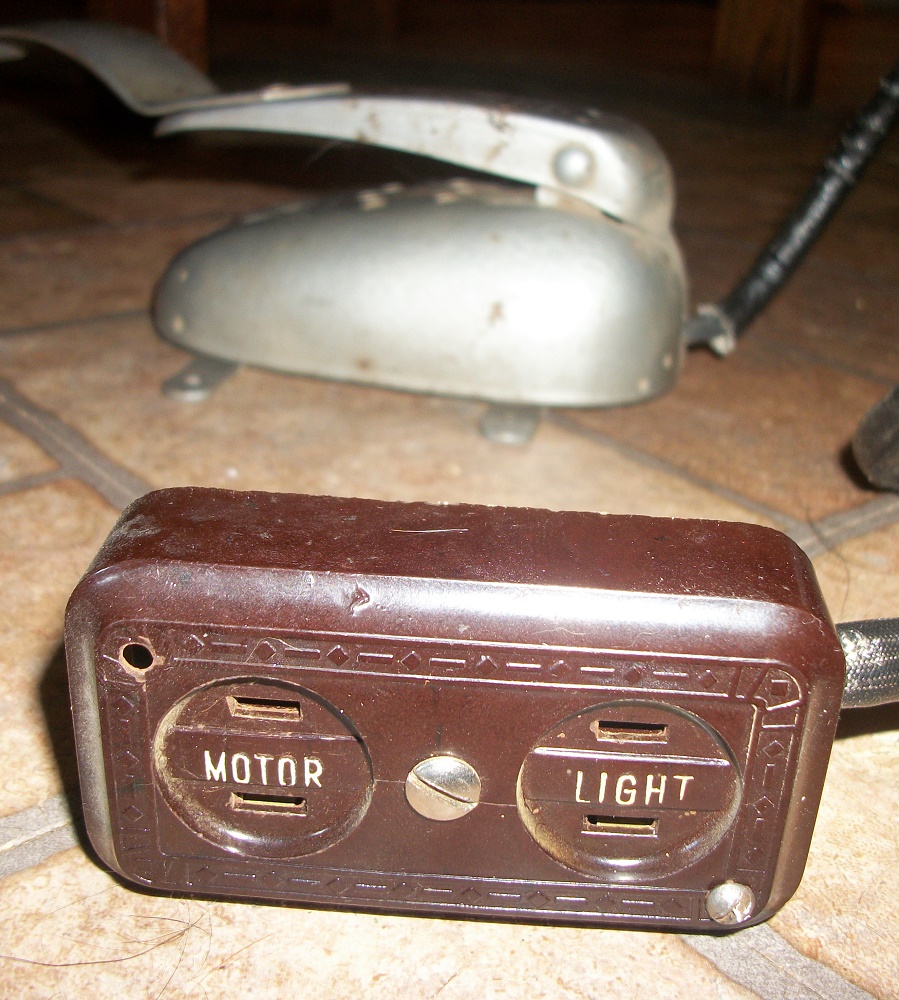 which he posted at Pictures of electrical connections plugs blocks If the motor was plugged into the light socket it would start sewing, but when it is plugged in to the motor socket, it will not sew until the controller is pressed.
Janey - Neat people never make the exciting discoveries I do.
04-26-2021, 08:25 PM
#25
Member
Thread Starter
Join Date: Apr 2021
Posts: 86
The block is actually labelled, so I'm pretty sure I didn't plug it in wrong, I really don't know what happened. The block wire looks old and awful compared to the light wire which was changed and also the "new" motor I guess may have been new. But the case or box whatever you want to call it for the "block" just came apart in my hands and according to my aunt something was missing inside of it. I did oil the sewing machine today though and put the tractor knob on it and it turns and sews very nicely. It's unfortunate that I can't figure out a way to make it electric or rig something up.
Do you know if it's possible to adjust the needle bar at all so it can take 15x1 needles? I looked at a video of grinding needles and everything but I don't think I'm brave enough to try it even though a desktop grinder really doesn't cost that much. It looks like mini welding to me and kind of freaks me out.
Do you know if it's possible to adjust the needle bar at all so it can take 15x1 needles? I looked at a video of grinding needles and everything but I don't think I'm brave enough to try it even though a desktop grinder really doesn't cost that much. It looks like mini welding to me and kind of freaks me out.
04-26-2021, 08:27 PM
#26
Member
Thread Starter
Join Date: Apr 2021
Posts: 86
I think maybe I acted in haste though. Maybe I should have just plugged the motor directly into a wall outlet instead of in that block that has the other connection for the light because I don't need the light as much as I could have used the motor. So that's a bummer. And maybe it wouldn't have smelled like it was burning. But I'd still need to be able to use the knee switch somehow. So I guess it wouldn't have mattered afterall. I wish I could just put an entirely new motor on it with a foot pedal instead of a knee switch.
04-27-2021, 05:57 AM
#28
Super Member
Join Date: Mar 2015
Location: Denver, CO
Posts: 4,357
I leave most of the electrical stuff to John. He has the tools and 'know how' to test and check things out. I do know you can get a motor block with a foot controller at many places, including https://www.amazon.com/HONEYSEW-Univ...8T22JC7M&psc=1
I suppose the wiring could have been switched in the block you have, but I haven't found that to be the case in the ones I've found. What happens if you plug the light into the motor socket or the light socket?
Janey - Neat people never make the exciting discoveries I do.
Not affiliated with off-site link(s)
04-27-2021, 09:52 AM
#29
Senior Member
Join Date: Apr 2020
Location: South of St Louis
Posts: 837
1. Rust in general; some people use Evapo-Rust and based on before/after pictures I�ve seen on the Board it looks fantastic. It�s kind of expensive, I have not used it. I have soaked parts in vinegar but when left too long I have had some pitting; if removed more timely I follow up with a brass bristle brush (from almost any hardware store) to brush off the part. I have also used fine grit sandpaper to remove rust as well, depending on the part; or I have used 0000 steel wool and sewing machine oil. I have also just used sewing machine oil with the brass bristle brush and that has worked well for me.
2. Oiling anything; only use sewing machine oil, real sewing machine oil, available online or Walmart or any sewing store.
3. Needles; Some people will use a whetstone to resharpen needles, especially if the needles are hard or impossible to find. You mentioned 206x13 as a possibility. You can get a pack from ebay for around $10, worth a try in my mind while you wait for CC1221s to pop up. There is probably a decal on the front right side of the base of the machine, in front of the pillar, that gives you the exact needle size, set a 206x13 on there and see if it matches, then try it in the machine if so. If you don�t have the decal then compare the 206x13 to your existing needle; you�re looking for the large end of the shafts to be even and then the eyes to line up.
4. Bobbins; this is a little more difficult. A bobbin for a Singer 301 or Featherweight is almost identical in size to the bobbin for the machine I have which I think matches your machine
The Vandervoort
Except the 301 bobbin lacks the hole or notch just outside the center hole which allows the bobbin to lock onto the bobbin winder. If I didn�t have bobbins that worked I would pick up 301 bobbins and go to a neighbor with a drill press and make the notches.
5. Motor; I have included some pictures of the motor mount on my machine. Is this what yours looked like? Can you post some pictures, including of the motor itself, and the wiring? I post pictures by going �advanced� on the reply options and then under the �manage attachments� button.
04-27-2021, 12:23 PM
#30
Member
Thread Starter
Join Date: Apr 2021
Posts: 86
So this machine apparently takes AD needles, according to the manual. But what's odd is the needles that came with the machine and fit are longer than cc1221 needs and also longer than the needle photo in the manual. And the needles from what I can see are labelled beldridge sp? Rotary needles and it has 2 numbers after it that I will try to make out with a magnifying glass. I bought a file and some modern needles to see what I can do, but I'll probably leave it all for the weekend to get into.
